I have been photographing the night sky for a while. Photographers living in Hawai’i are blessed with remote areas at high altitude that are perfect for photographing the night sky. Remote, high altitude areas provide conditions that are necessary for successful and beautiful nighttime images of the milky way and the moon, including limited or no light-pollution and little atmospheric distortion from manmade pollution or haze. What has really captured my interest recently has been to try to photograph deep space phenomenon such as galaxies, star clusters and nebulae – astrophotography.
As I began to research how to take images of celestial objects and the gear I needed, it became clear that there were two directions to take. One was to invest in an expensive telescope and DSLR setup (some computer-driven). Prices for these systems can run into tens of thousands of dollars. As a novice, I decided to try my hand at using the cameras and lenses I had and my TVC-33 tripod, leveling base, BH-40 ball head and Large RSS dovetail plate. I initially used my Canon 5D Mark IV with either 24-70mm f2.8 zoom lens, 70-200 mm f2.8 zoom lens (with 1.4 extender) or 600 mm f.4.0 lens (with no extender). I ultimately have shifted to my Sony A7r IV because of the larger 61 megapixel, full-frame sensor for greater detail and light weight, coupled with a Metabones Canon lens to Sony Adapter V to enable the use of my Canon lenses. After my research, I also purchased astrological stacking software, a star tracking system, laser pointer and I use a phone app for quick identification of where celestial bodies can be found.
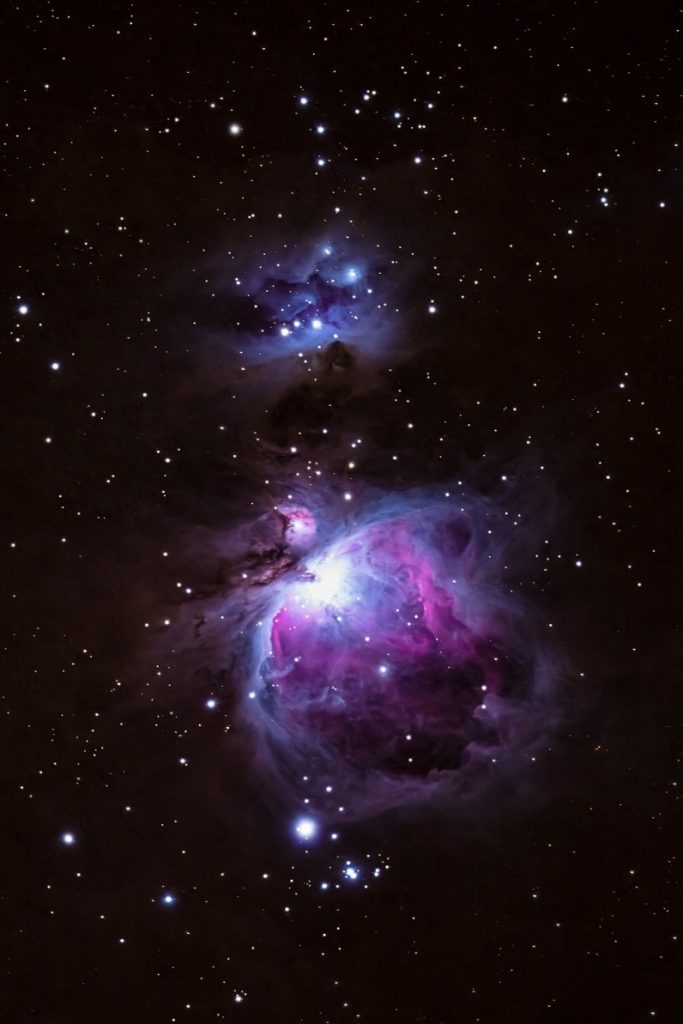
Orion & Running Man Nebula: 16 frames total (12 Frames & 4 Black Frames), F4.0, 80 Seconds, ISO 3200
To photograph celestial bodies including star clusters, nebulae and galaxies, you will get the best images with using a star tracking system. You can take images of celestial objects without a tracking system, but by using one, you will be able to use longer exposures to get greater detail and less noise by being able to use a lower ISO as well. With the use of a tracking system, I can now increase the length of exposure without creating star trails. A tracking system must be capable of locking onto Polaris, the North Star, while taking the long exposures necessary to capture the best details and most brilliant colors of the object you have chosen to photograph. Polaris is the only fixed point in our sky that does not appear to rotate around the earth’s axis. It rises and sets but does not turn. You will have star trails if the tracking device is not fixed to the position of Polaris. There are many tracking systems out there and for someone that is just learning there are a few good ones. After deciding on the Sky-Watcher Star Adventurer star tracking system, I had to determine any limitations, including the maximum weight bearing limitations this system might have for camera, lens and ball head I wanted to use. For the Star Adventurer, a maximum of 11 pounds can be mounted. This added to my decision to use the lighter-weight Sony A7 IV and my smaller Really Right Stuff ball head. Using my 600 mm Canon prime lens exceeded this weight limit, so I DO NOT recommend using such a heavy lens with this system. It is possible to get very nice images with lighter-weight, shorter focal length lenses. Make sure you familiarize yourself well with use of the system by reading the instruction manual, including how to attach your camera set-up and ball head. There are multiple accessories to enable this, including optical accessories, ball head adapter, equatorial wedge to adjust the latitude alignment of the system (how high or low and the direction you point the camera lens toward what you are trying to photograph) and fine-tuning mounting assembly. I recommend setting up the system at least once in your house in a controlled environment so you can see how the whole system goes together with your camera attached. You can even go through the steps of locking onto Polaris and activating the system.
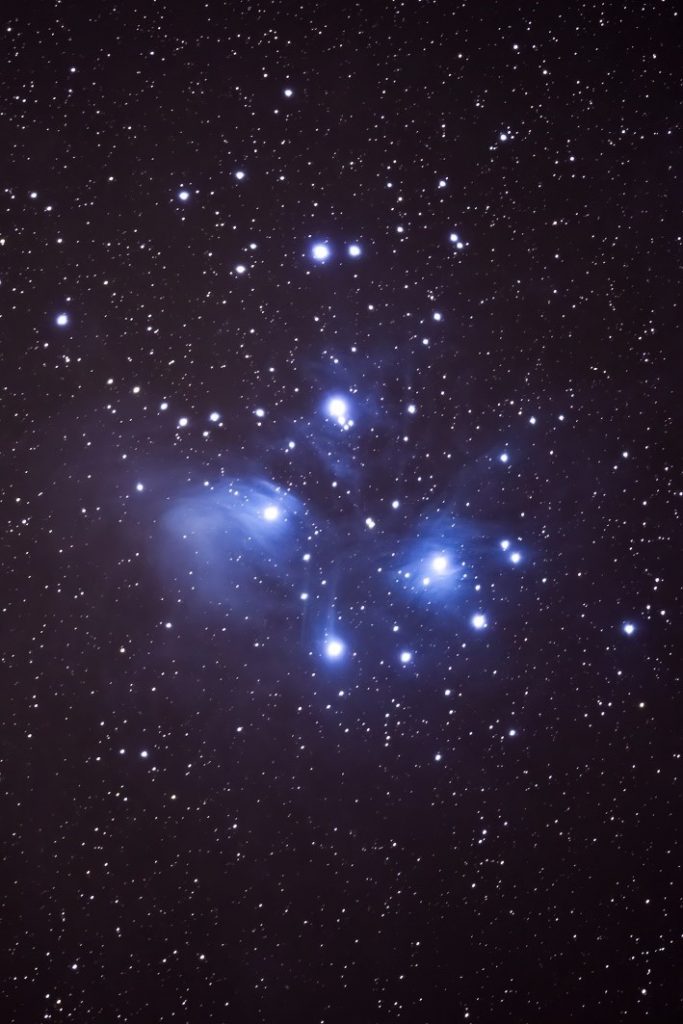
Pleiades/Seven Sisters: 12 Frames total (8 frames & 4 Black Frames), F4.0, 60 Seconds, ISO 6400
It is a good idea to scout the location for shooting in advance and to plan when you can see the weather is likely to give you clear, cloud-free skies and minimal wind (to avoid tripod shake). When you have decided on which celestial body you wish to photograph, the use of one of the good star guide phone application will give you an idea when it will be visible in your chosen location and help you plan the shoot. There are many good apps available for both iPhones and Androids. I use Star Guide on my iPhone.
For any type of long exposure photography, a high-quality, sturdy and easy to use tripod is a must have. I have used Really Right Stuff tripods for years. As a fine art landscape photographer, a stable platform for my camera while shooting is as important as the camera set-up. Really Right Stuff tripod gear is extremely rugged, of highest quality construction and the ease of use locking levels for ball heads, leveling base and plates make it the only gear I use in the field. I find the leveling base an extraordinarily useful tool to make sure the gear mounted on the tripod is completely level. Instead of fiddling with adjusting each leg length multiple times to get it right on rough terrain, the leveling base allows you to make easy adjustments and lock it in place. Really Right Stuff ball heads use the same locking levers as the leveling base and are rock solid once set. This is doubly important since the star tracking system will be very slowing moving to keep Polaris locked in. I am always fully confident of the security of my gear when I use my Really Right Stuff tripod set-up.
Once you get your tripod level, can mount the Star Adventurer tracking system and set it to track Polaris. With Star Guide or another phone app, you can locate where Polaris is in the sky. You can point the Star Adventurer to the general area and try to look through the viewfinder to find Polaris. From experience, this is not easy to perfectly lock in the system to Polaris’s position by sighting through the eye piece. Although you may see and be able to identify Polaris easily with the naked eye once you are looking through the eye piece. From this magnified view, one star can look like every other one. This is where the laser pointer comes in. Anchor the laser beam directly on Polaris. When looking through the viewfinder on the Star Adventurer, you can now easily see the laser on Polaris. Once you have the Star Adventurer adjusted to the area, you can use the fine-tuning assembly and Equatorial wedge to position the tracking system. Make sure the unit is turned on so it will track the star.
Horse Head & Flame Nebula: 15 frames total (12 Frames & 3 Black Frames). F4.0, 45 Seconds, ISO 3200

The next step is to attach the ball head and tracker accessories and your camera equipment to the system. Be very careful when setting up the remainder of the system and attaching your camera gear to not disturb the tripod or tracking system. Knocking the tripod legs or being heavy-handed while attaching camera gear may knock it off from being locked onto Polaris, causing star trails in your image.
Now you can use your phone app star guide to identify where in the sky what you want to photograph is located. You can once again use the laser pointer to help point the camera and lens to the right location. Once this is done, you are ready to shoot!
The ISO I am using varies between 800 and 6400 and my exposure time for each exposure is between 45 and 80 seconds. Different subjects may work with different settings, so it is good to experiment and see what works best. For the images given here, I have taken between 12 and 16 frames to process stack (including a series of black frames with the lens cap on to increase the depth of black space in order to accentuate colors and details of the celestial body I am photographing) I use the Starry Sky Software for stacking. I am currently not using any filters for frames to accentuate specific light wavelengths and colors of those wavelengths. You can do some research on astrophotography filters to see if you would like to try this to improve your images.
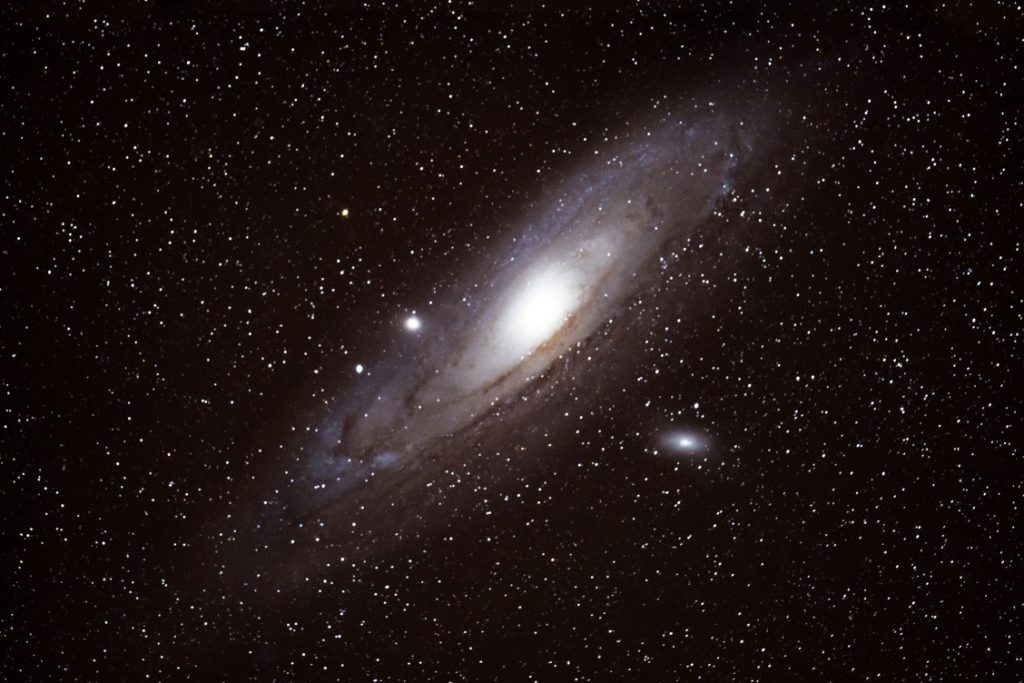
Andromeda Galaxy: 12 frames total (8 Frames & 4 Black Frames) F4.0, 60 Seconds, ISO 2500
Once you have completed your shoot and have gotten your images loaded onto a computer, it’s time to stack the images (I use the Starry Sky Software to stack images). After this is completed, you can bring the image into Photoshop, Lightroom or any other photo-editing software you use to fine tune the images to your liking.
I am still a novice at astrophotography and have much to learn. I am sure I will learn more techniques and may well add more items to my astrological gear bag as I go forward. I am hoping this will encourage others to get involved with astrophotography knowing it can be done with mostly already existing gear.
My gear list for deep space astrophotography:
Really Right Stuff Gear (https://www.reallyrightstuff.com/)
- TVC-33 Tripod
- TA-4-LB Tripod Leveling Base
- TH-DVTL-55 Dove plate
- BH-40 Ball Head
Sony Gear (https://www.sony.com/electronics/cameras/)
- α7R IV 35 mm full-frame camera with 61.0 MP
Canon Gear (https://www.usa.canon.com/)
- 5D Mark IV 35 mm 30.4 Megapixel full-frame sensor
- 24-70mm f2.8 zoom lens
- 70-200mm f2.8 zoom lens
- 600 mm f4.0 prime lens
Metabones Gear (https://www.metabones.com/)
- Metabones Canon lens to Sony Adapter V
Sky-Watcher Gear (https://www.skywatcherusa.com/collections/star-adventurer/products/star-adventurer-pro-pack)
- Star Adventurer Pro Pack
Starry Sky Stacker Software (https://sites.google.com/site/starryskystacker/home)
- Starry Sky Stacker Software (for deep space images)
- Starry Sky Landscape Stacker Software (for images of milky way)
StarGuide phone app (from Apple app store)
Spike Optics High Power and Durable Infrared Red Dot Laser Sight/Adjustable Laser Sight (can be found on eBay & other similar shopping sites)
About Tom
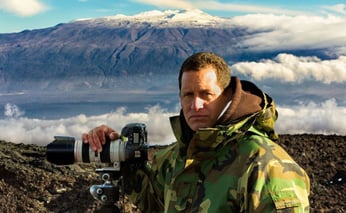
Tom Kualii is an Island native, born and raised in Hilo on the Big Island of Hawaii. He first picked up a camera in 2004 while on deployment to Iraq. Since then he has built a passion in creating fine art nature and landscape images. Tom also associates his Hawaiian Culture in most of his work so you can feel the “Mana” or spiritual connection with each image. Most often creating images of his volcanic Hawaiian Islands, the lava fields of the Goddess Madame Pele, the beautiful and rugged coastlines to the summits above the clouds. A special place he calls home.