Macro is often defined as capturing an image at a magnification of 1:1 or greater. By definition, a true macro lens achieves 1:1 magnification or life size without additional attachments. I’m actually not concerned about arbitrary definitions for macro or even magnification ratios. Each field of photography has its own demands and technical considerations and macro certainly has some challenging technical demands. Most articles start off with all kinds of technical diagrams, magnification ratios, and depth of field charts etc. All this techno jargon is enough to send a budding macro enthusiast running for the hills. A lengthy book is necessary to even begin to cover all the considerations for macro photography. This article conveys my rather simplified approach to macro, and these tips/techniques work in a wide range of situations. Keep in mind there are other ways to accomplish the same thing, and many nuances to the best approach in any situation.
Indeed macro or close-up photography does require a certain amount of specialized gear for capturing small subjects in the field or in the studio. The best option is a true macro lens, built to shoot close and maintain high optical standards for resolution and edge-to-edge sharpness. If just venturing into the world of macro, you may not wish to invest right away in a dedicated macro lens. Thankfully there are accessories for making lenses we have focus much closer and function like a macro lens.
Extension tubes are a great first choice; making just about any lens focus closer and making the lens suitable for any macro work. Extension tubes are hollow, containing no optics: there is no loss of optical quality, but there is some loss of light. Extension tubes fit between the camera body and lens, effectively moving the lens further from the sensor, thus improving minimum focusing distance. Modern cameras adjust exposure automatically to compensate for the reduced light. Extension tubes are often sold in sets of three and at varying lengths. In simple terms, the longer the extension tube, the closer you can focus. Keep in mind that multiple tubes may be stacked together for maximum magnification. In my experience a 25mm tube is the single most useful tube in my bag.
Also note that once an extension tube is added to a lens, the lens no longer focuses to infinity. Adding tubes to a lens, greatly reduces the focusing range. Once a tube is attached, the new focus range may only be useable from a few inches to a few feet from a subject. This is to be expected, we attached the extension tube to get closer, we don’t care about focusing far away at this point. The tube simply lets us move the lens much closer to the subject and still maintain focus. If fact, the only reason to put an extension tube on, is so you can move closer to the subject for higher magnification, and still maintain focus. Note: A 25mm extension tube attached to a 50mm lens has a tremendous impact on how much closer that lens can focus. Attach the same 25mm tube to a 200mm lens and the tube has far less impact on how close the lens will focus. It may take two or three tubes on a telephoto lens to make it focus as close as desired.

Another low-cost option is diopters for the front of your existing lenses. Canon and Nikon both manufacture high quality diopters. These are available in two different strengths and are available in 77m and 52m filter sizes. Diopters work very well on longer zoom lenses such as popular 70-200, 70-300, 100-400 lenses. These handy close-up lenses screw onto the front of a lens like a filter. The best diopters are high quality, consisting of two elements, making them easily twice as thick as cheap low-quality diopters. The two-element design pays big dividends in preserving the image quality of the original lens. Diopters do not reduce light transmission thus no exposure adjustments are necessary. When used on a zoom lens they have a very special characteristic. Once focus is obtained, the lens can be zoomed to change the size of the subject in the viewfinder, without going out of focus, and that is a miracle in the macro world. When a diopter is attached to the front of a lens, the lens will have a limited range where it can achieve focus.
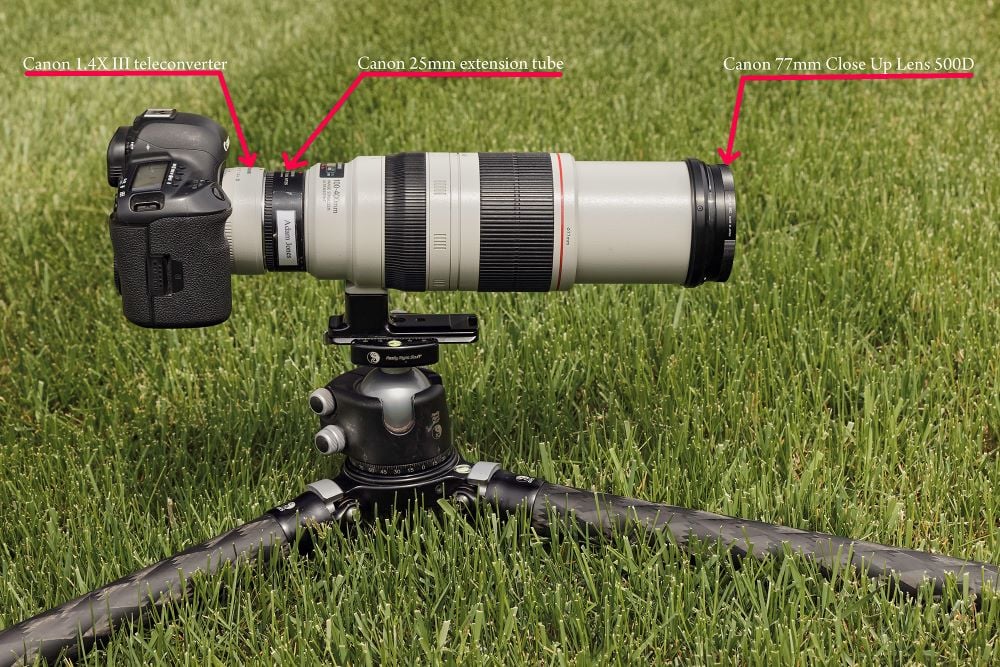
A teleconverter is another accessory you may already have in your camera bag. These handy optics magnify the subject by 1.4X or 2X. A teleconverter can rescue the situation providing additional magnification when moving closer to the subject is impossible. By adding a teleconverter, you multiply the magnification without moving closer. Teleconverters do not improve minimum focus like an extension tube, but they do make the image larger from any given distance. I like to mix and match extension tubes and teleconverters on my EOS 100-400 IS II lens to greatly extend its already great close focus. I don’t always carry a dedicated macro lens into the field, but I always have the 100-400, teleconverters, and extension tubes in my bag. When the need arises, these accessories do a fine job of transforming this excellent zoom into a very useable close-up lens. These same accessories are also used on all three of my dedicated macro lenses: 50mm, 100mm, 180mm.
We’ve discussed some relatively simple ways to get into the close-up/macro world with gear you may already own, or with an investment in relatively inexpensive accessories.
Let’s take a look at my gear and a short synopsis of how each item works for me.
Canon 1DX Mark III or 5D Mark IV
Canon 7D Mark II 1.6 crop body
50mm F2.4 macro
100mm F2.8 macro
180mm F3.5 macro
MPE- 65 1X – 5X magnification
100-400 F4.5-5.6 IS II
3 extension tubes
Polarizing Filter
1.4x and 2x teleconverters
RRS Tripod- TVC-34L
Camera Bodies: Just about any camera body is fine for macro photography. Some bodies may have lots of bells and whistles making life easier or more convenient, but these features are not a must. I often use the 7D Mark II (1.6x crop body) to obtain a higher magnification vs full frame bodies. Live View and/or mirror lockup are features I consider essential for macro, as well as a way to trip the shutter without touching the camera.
50mm F2.5 Compact macro: This is my workhorse indoor studio lens during my annual dart frog macro workshops. In our workshop setting, I’m hand holding the gear for 6 hrs. a day, and this lightweight rig does not wear my arm out. Indoors, I’m in control of the lighting, the subject, and the backgrounds making it easy to use this relatively short focal length macro. This little lens is a gem indoors, but it’s my least favorite macro lens for outdoor use. It simply forces me to be impossibly close to the subject in many field situations. There is no tripod collar on this lens, thus readjusting the camera from vertical to horizontal requires reframing and practically starting over from a new position on a tripod.
100mm F2.8 macro: This and the 50mm are my two most used macro lenses indoors in the studio and classroom, again for the same reasons mentioned above. I feel the 100mm macro is the shortest focal length I use for significant field work. The100mm macro offers much better working distance in the field for small subjects than does the shorter 50mm. Most 100mm and 50mm macro lenses are about as sharp as they can be designed, so no problems with their optical quality.
180mm F3.5 macro: This is far and away my most used macro lens in the field. The longer focal length affords a much greater working distance from skittish insects and other subjects. The longer lens allows placement of the tripod to be far enough from the subject as to not disturb the very subject we are trying to photograph. When stalking moving subjects such as bees and butterflies, the extra working distance allows me to approach close without scaring off skittish subjects. When shooting dew covered spider webs, heat radiating from your body is enough to cause movement in the web. A longer lens keeps the photographer far enough away this is not a problem. Is the 180 macro lens perfect? No, it has a few downsides: Its large, heavy, and it’s the most expensive of the three I own.
MP-E 65mm F2.8 macro: This is a very unique and specialized lens from Canon. This lens begins where the maximum magnification of most macro lenses ends. It starts at 1:1 or life size and goes to 5X or five times life size. With this lens, a ladybug will fill the entire viewfinder at 5X. The lens demands very meticulous attention to detail to get the most from it. Even the slightest vibration can ruin images at extreme magnification. The lens has no focus ring thus, the camera/lens rig must be moved in and out to achieve focus. A sturdy focus rail makes precise movement in and out from the subject very possible. When you really want to fill the frame with tiny subject matter, this lens is hard to beat. Grains of table salt taken at 5x look like large building blocks.
I don’t always use filters on macro subjects, just know there are some situations where the shine on waxy leaves, even with overcast lighting can be very distracting. A polarizing greatly helps remove unwanted shine, and reflections, letting the subjects true color pop.
See the difference in these two butterflies, shot from a tripod with a 180mm macro. One is shot with a polarizing filter and one without. It’s clear the waxy leaf had a strong sheen on it, even on a very overcast day.
-
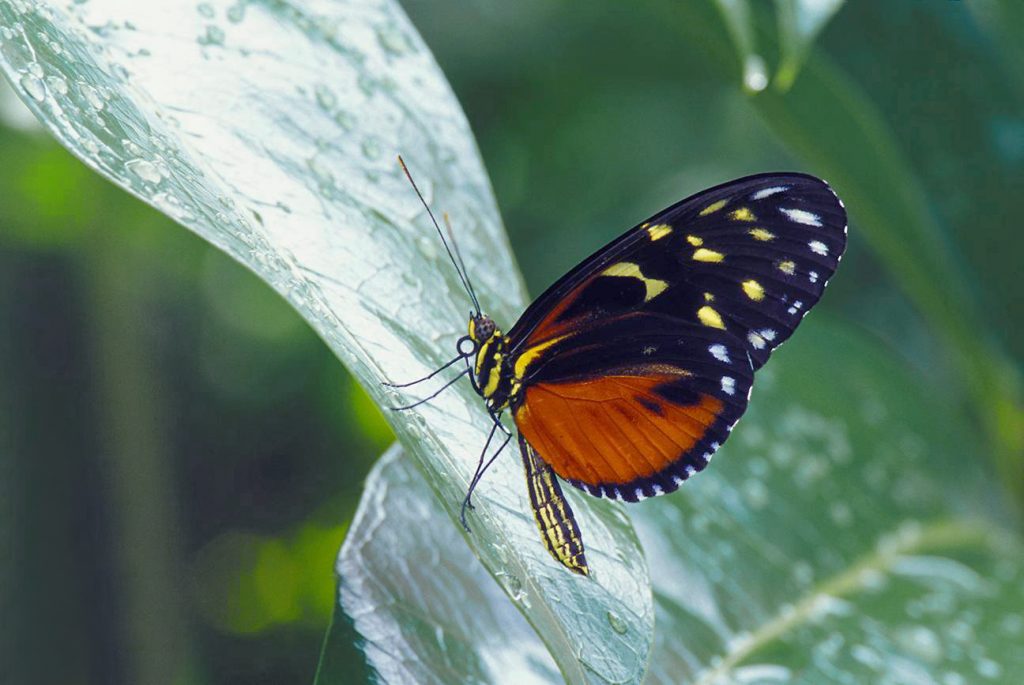
Natural light, No Polarizing filter -
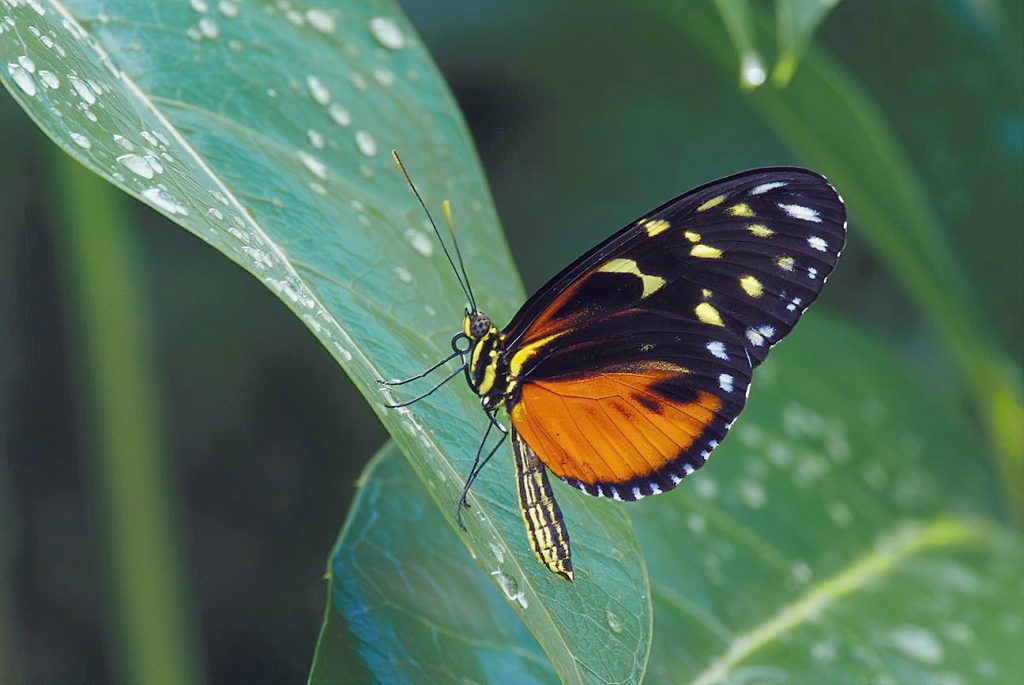
Natural light, Polarizing filter elimated the shine on tropical leaf
Teleconverters/Extension Tubes:
As mentioned previously, these can be used to add functionality to non macro lenses, or add additional magnification to true macro lenses. Keep in mind, the extension tube simply allows you to move the camera closer to the subject for a larger image. Teleconverters on the other hand, increase the magnification without moving the camera closer. Both are great choices and don’t forget to try using both at the same time. If using an extension tube and a teleconverter, most of the time it is best to put the extension tube on next to the lens, then add the teleconverter between the extension tube and camera body.
Tripod:
Most of my macro work involves use of a very sturdy tripod. Macro demands precision focusing and an absolutely steady camera that only a tripod can afford. It can be a pain dealing with a tripod in tall weeds looking for dew covered insects, but the results are worth the effort. I consider a tripod essential gear for most situations, and macro especially so. We will discuss some hand holding techniques a bit later.

About Adam
This internationally recognized photographer explores the world through his nature, travel, and wildlife images. Jones’s award-winning photography is widely published in magazines, posters, calendars, books, and in national advertising campaigns for clients such as Canon, Ford, Eddie Bauer, Miller Beer and Honda.

Adam is recognized world wide as an outstanding stock photographer with his images represented by Getty Images, and Danita Delimont Stock Photography. His work has sold for editorial and commercial uses in over 30 countries.
His publication credits also include: National Geographic Books, Time, Life Magazine, National Wildlife Federation, Audubon, Sierra Club, Disney and hundreds of textbooks. In 1995 the BBC Wildlife Photographer of the Year Contest selected Adam’s image from over 19, 000 entries, as the winner in the “In Praise of Plants” category.
Adam’s images are featured in nine coffee-table books.
In early 2006, Adam was selected to be one of Canon USA’s elite group of acclaimed photographers, “The Explorers of Light”. Canon describes the Explorer of Light program as such: The Explorers of Light program is a group of 60 of the World’s best photographers united in their love and passion for photographic excellence. They share a common desire to contribute back to the industry with a willingness to share their vision and passion with others.
Adam is a popular and respected workshop leader and lecturer. Adam teaches photography workshops around the world helping students reach their full potential in the exciting world of digital photography. Adam is noted for his enthusiastic down to earth approach and his ability to communicate effectively with all skill levels