How to Photograph Hummingbirds in Flight
Hummingbirds only live in the Western Hemisphere. There are over 300 species of hummingbirds in the world, and less than two dozen are seen in the U.S. and Canada. The reason I bring my hummingbird photo tour to Costa Rica is because there are so many species of stunning, tropical hummers that live there.
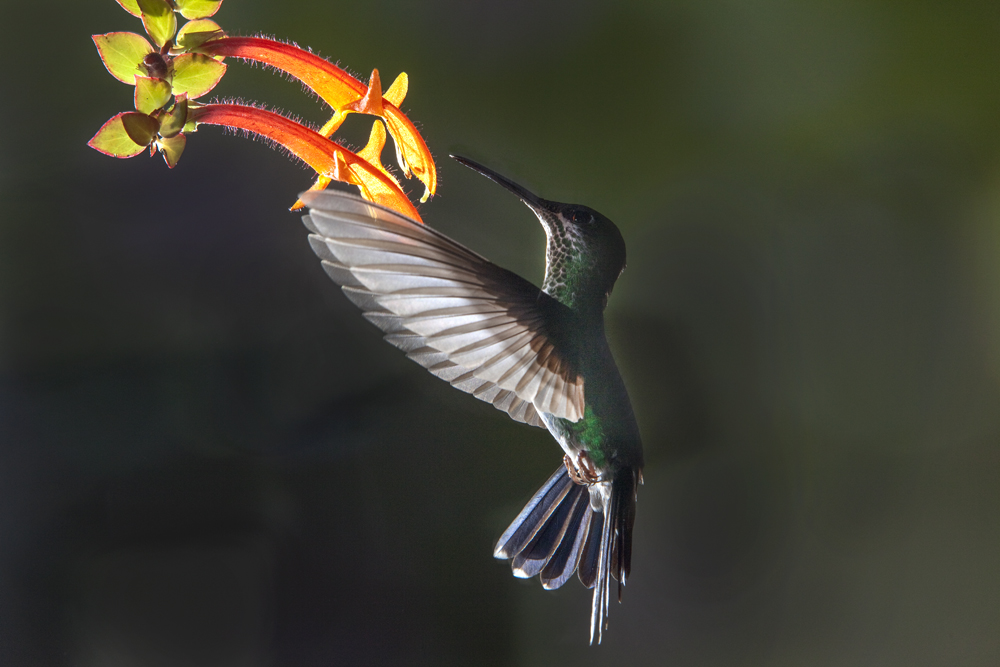
Green-crowned brilliant hummingbird, 1/200, f/18, 250 ISO, 200mm focal length
The wings of hummers flap between 50 and 80 times per second, which makes it impossible to freeze the wings with normal shutter speeds. Sure, you can use shutter speeds like 1/4000th or 1/8000th of a second, but that would give you no depth of field (because the lens aperture would have to be so large to compensate for the light loss) and the ISO would have to be extremely high with the resulting excessive noise and degradation of image quality. Anyone can photograph a hummer and blur the wings, but to see and appreciate the exquisite detail in these little gems, they should be captured in flight with tack sharp clarity.
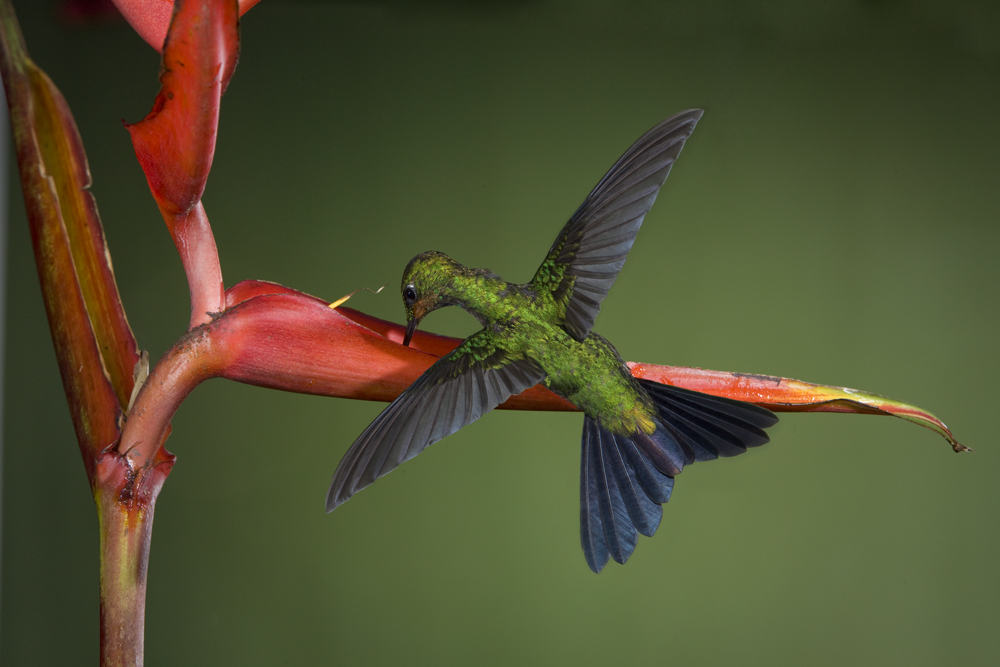
Green-crowned brilliant hummingbird, 1/200, f/16, 250 ISO, 170mm focal length
So, how do you do that? Here is an outline of the technique:
1. Begin with a place where there have been several hummingbird feeders for an extended period of time and where the birds visit them frequently. Over time, you can have dozens of the little hummers nectaring on the feeders daily.
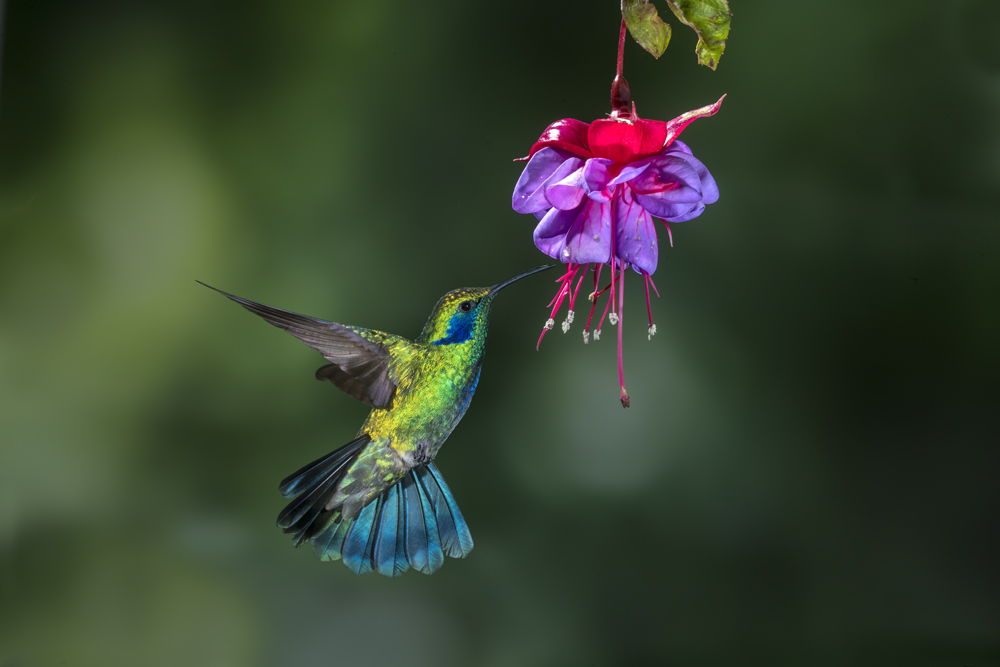
2. Place a flower in a shaded photo location (not in direct sunlight) by clamping its stem to a tripod or light stand, or by placing it in a vase on a small table. Make sure you choose a species of flower that can hold nectar in a petal or some other structure of the plant. When you are ready to shoot, take the feeders away and the birds will go to the flower. Place nectar in the flower with an eyedropper or syringe. You can buy pre-mixed nectar for hummers, or you can make your own: one cup of sugar to four cups of water.
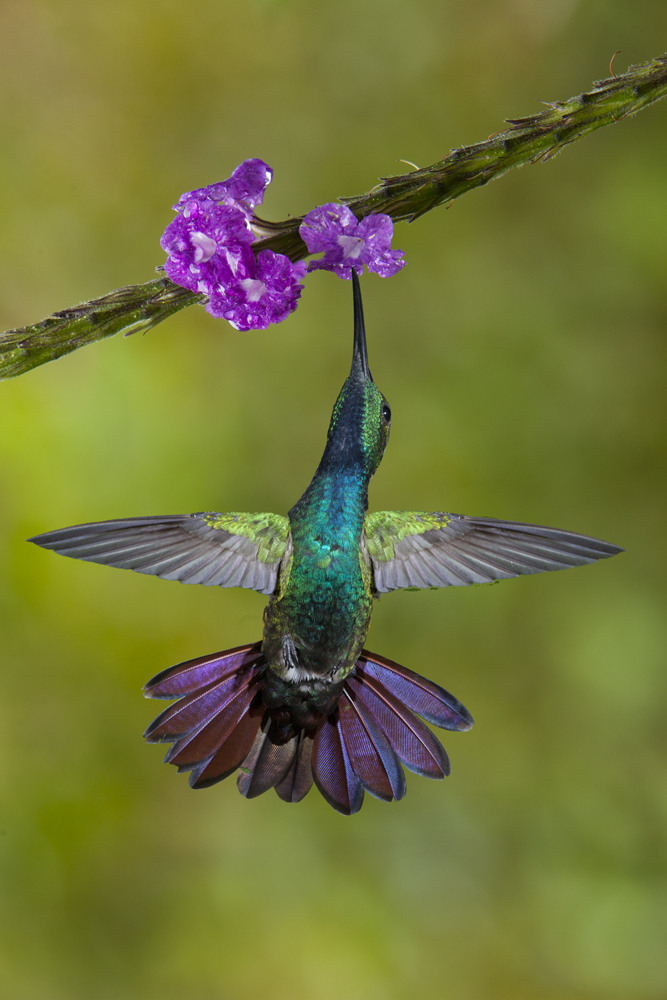
Violet sabrewing hummingbird, 1/200, f/16, 250 ISO, 200mm focal length.
3. Set up three or four light stands with a flash affixed to each one. Some photographers use more flash units, but that’s completely unnecessary. Using more flash units mean there are too many catch-lights in the eyes, and this looks unnatural.
4. Adjust the power of the flashes to 1/16th power, and the flash mode must be on manual.
5. Place a photo print of out of focus foliage behind the flower. It should be three to five feet from the flower, and it can be a paper print with a matte surface that’s mounted on foam core or a banner print on fabric. The latter is available through FedEx Office. Make sure you don’t print the out of focus foliage image on any kind of canvas with a pronounced texture.
6. Arrange the flash units so one of them illuminates the background while the others illuminate the flower where the hummingbirds will be. I place two flash units at approximately 45 degrees to either side of the front of the flower, and I set one flash behind the flower off to the side.
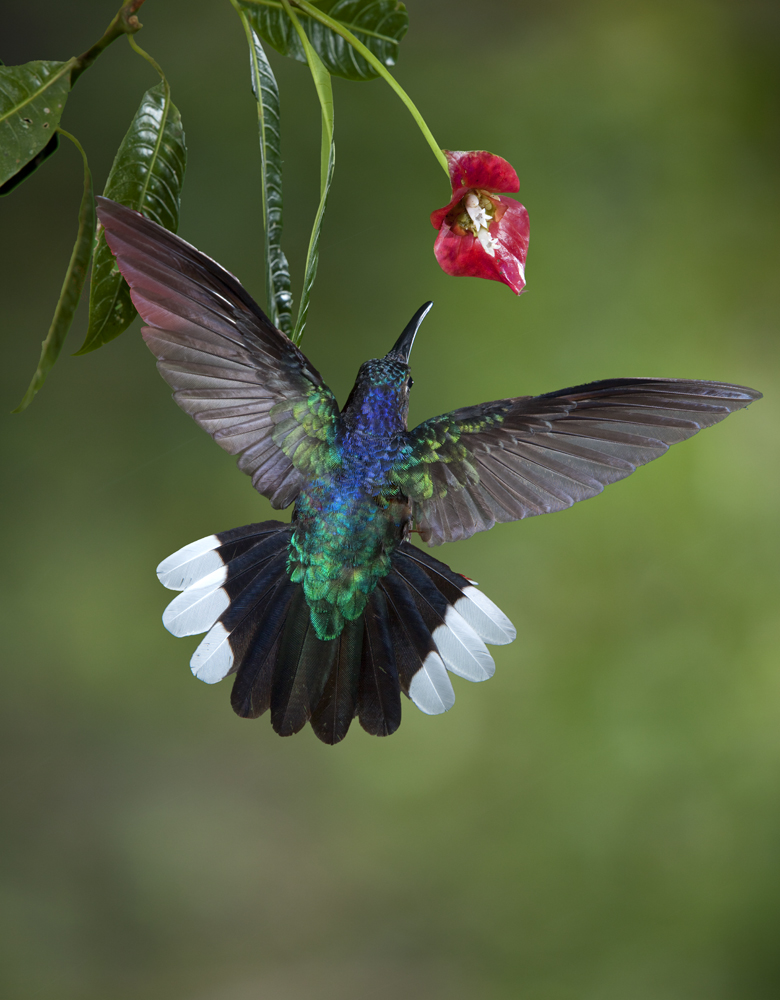
Green-crowned brilliant hummingbird, 1/200, f/16, 250 ISO, 200mm focal length
The Exposure
The exposure is determined by the f/stop, the ISO, and the distance of the flash units to the flower. I use f/16 or f/18 to insure the depth of field is sufficient so the entire bird is sharp, and my ISO is typically between 250 and 640. By moving the flash units closer and farther to the flower, you can come up with a perfect exposure. Before the hummingbirds start nectaring, take a test exposure on the flower and the background. If either the foreground or blurred foliage print are too light or too dark, vary the exposure by adjusting the distance of the flash units.
The shutter speed should be 1/200th or 1/250th. These speeds are the maximum sync speeds on most cameras. The f/stop – shutter speed combination will eliminate the ambient light, which is what you want, so the only illumination comes from the flash.
The reason the flash has to be used on 1/16th power is because this reduces the flash duration – the actual time the light inside the flash is on – to about 1/16,000th of a second. This freezes the wings. The brief burst of light replaces the shutter speed in determining whether or not the wings of the birds are frozen.
Using a low power setting means the light output is reduced a great deal. To compensate for this light loss, the flash units must be placed very close to the flower. The flash-to-subject distance should be about 15 to 18 inches. Surprisingly, the birds don’t mind this close proximity.
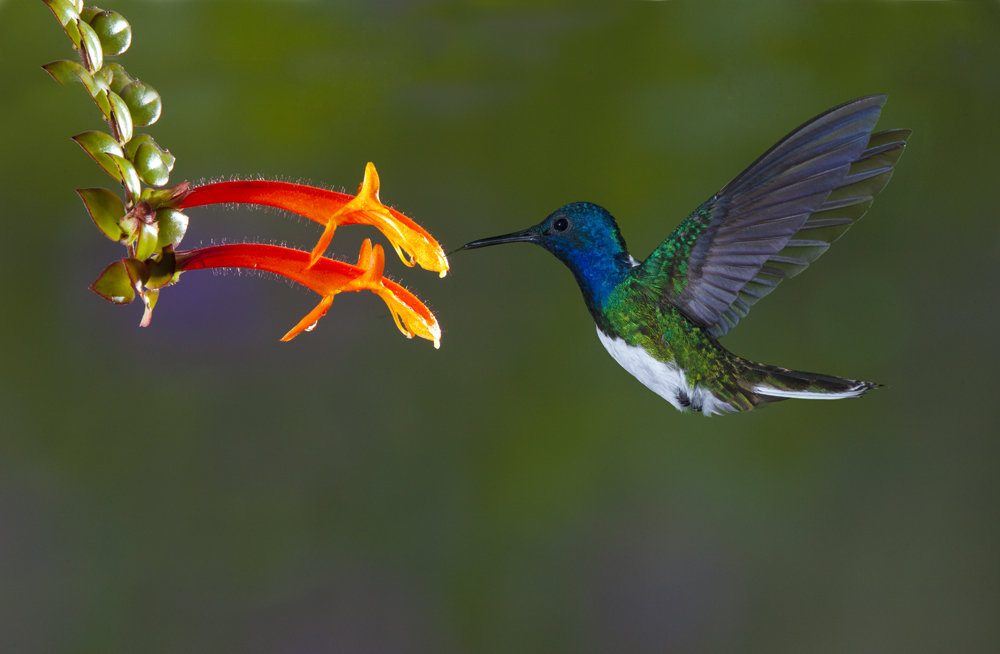
White-throated jacobin hummingbird, 1/200, f/16, 400 ISO, 170mm focal length
The Physical Setup
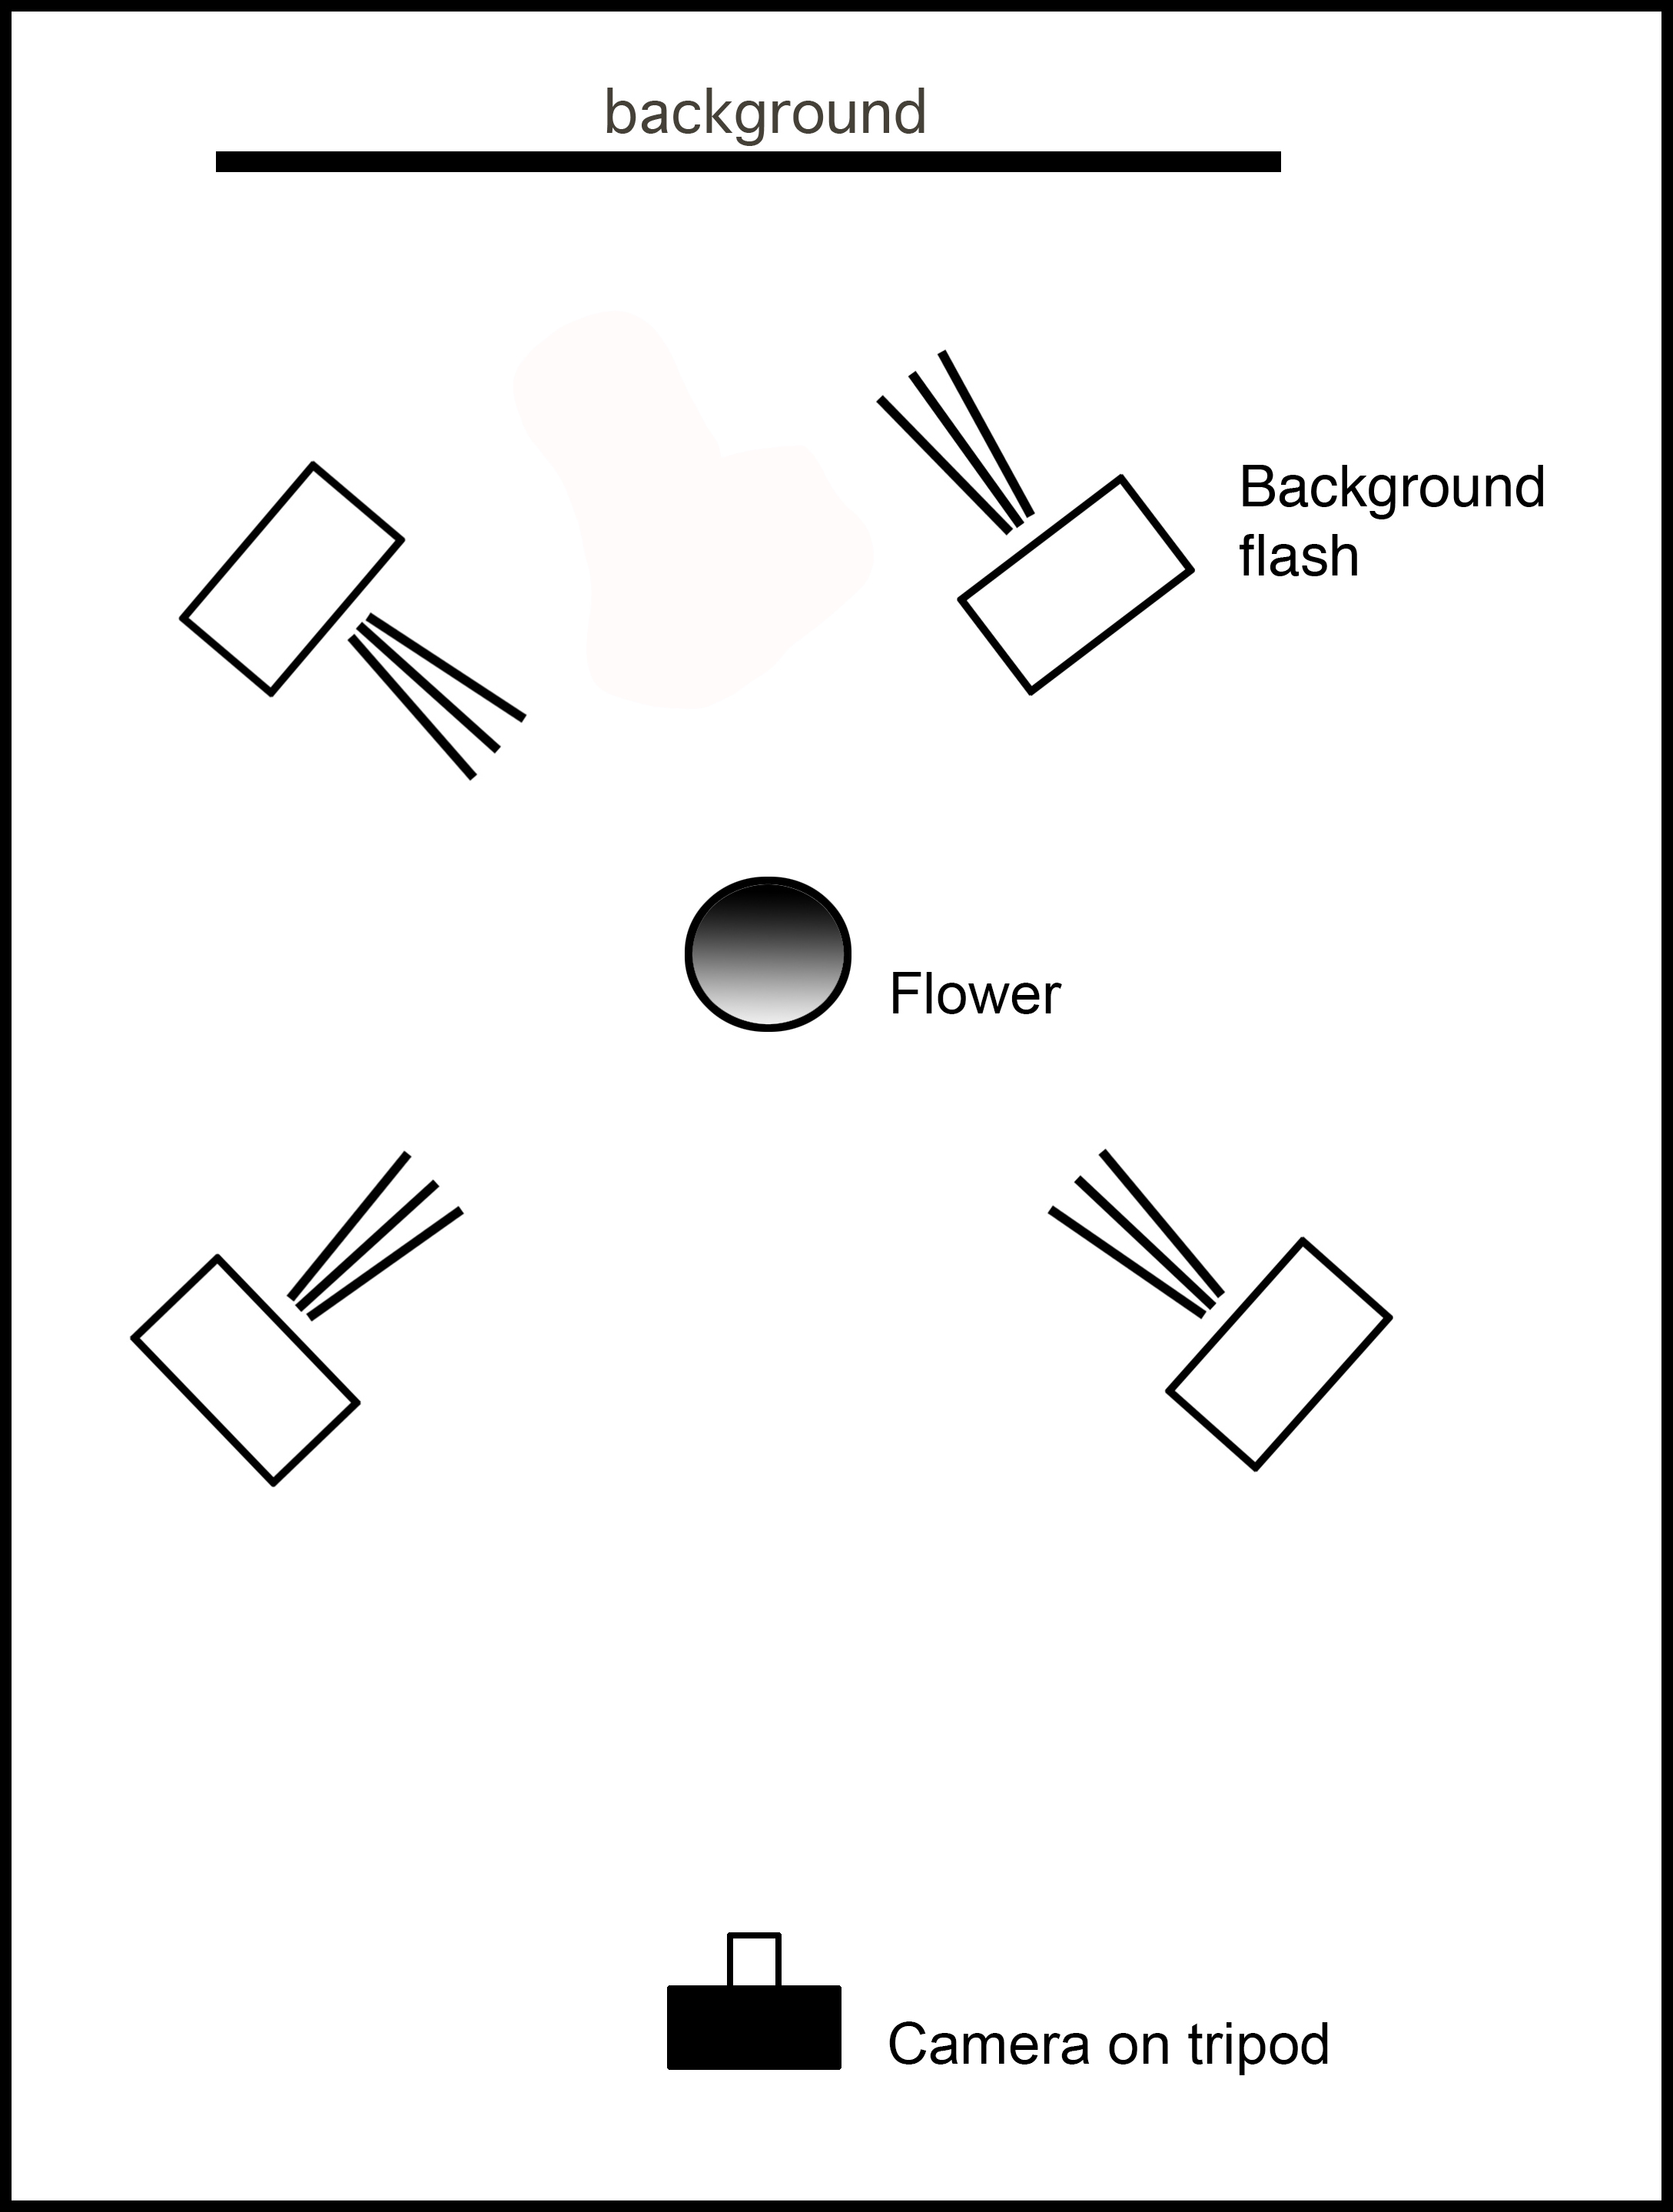
See the diagram of the arrangement of the various elements that I use to photograph hummingbirds. The flower is about 8 feet from the camera, and the print of out of focus foliage is 3 to 5 feet behind the flower.
I use the out of focus foliage print to prevent the background from becoming black. Hummingbirds are diurnal. A black background would look unnatural. Therefore, I printed several 20 x 30 inch prints of out of focus foliage photos and had them mounted on foam core. I simply clip the prints to the back of a chair, a light stand, or whatever is handy.
All of the flashes should be the same model. If you mix flash units, ghosting may occur. Set the flash units to slave mode and trigger them from the camera with a transmitter made for your camera.
I suggest using a tripod so you don’t have to hold the camera and worry about focus. Pre-focus on the flower and switch to manual focus. Use a medium telephoto lens such as a 70-200mm, 100-400mm, or 80-300mm. I use the BH 55 LR ballhead because I like the rock-solid rigidity even when using a long lens.
Green violet ear hummingbird, 1/100, f/18, 500 ISO, 330mm focal length
Recycle Time
The recycle time is the number of seconds it takes for the capacitor in the flash to charge after having taken a picture. If you use the flash with a small f/stop or on manual mode so the flash puts out maximum light, or if the batteries are low, the recycle time will be long. This can be frustrating because you can’t shoot until the flash is ready.
When you set the flash to 1/16th power, however, the recycle time is virtually instantaneous. As a hummingbird hovers over the flower, you can shoot as fast as your finger can repeatedly push the shutter button. Since it’s impossible to see the position of the wings as you shoot, take as many shots as you can while each hummer hovers at the flower. Many of the images will be discarded, but you’ll get many winners, too.