Create an Image with Impact
Rick Sammon
www.ricksammon.com
It’s great to be posting here on the Really Right Stuff blog. I think you will find this post – and my future posts – fun and informative . . . because I like to make learning fun.
The idea in this series is to show you what I call the “evolution of an image,” going from idea to image. I’ll show you my before and after shots and include photo processing info.
Let’s go!
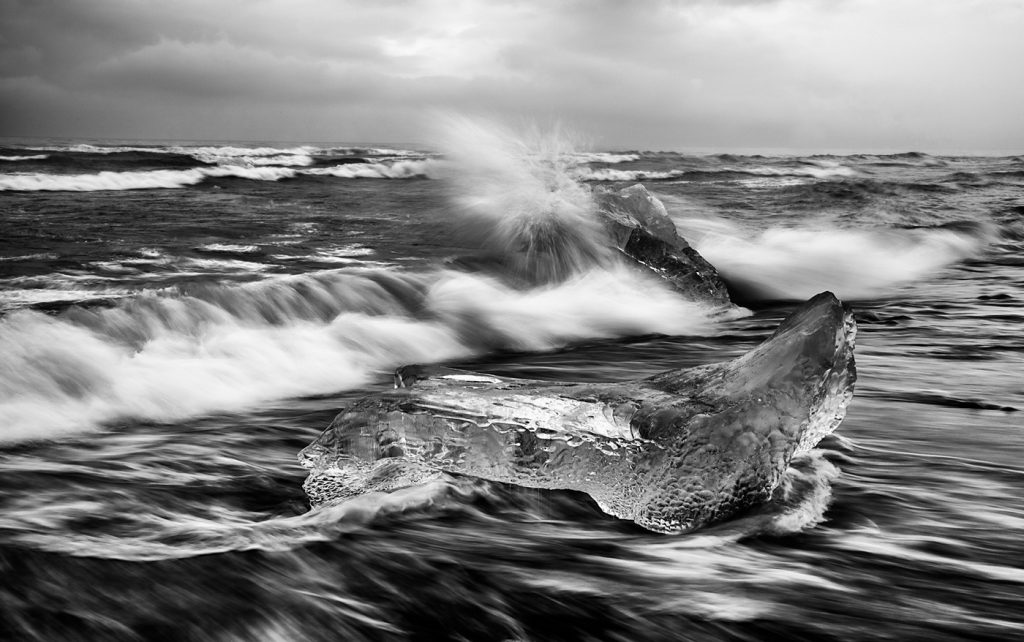
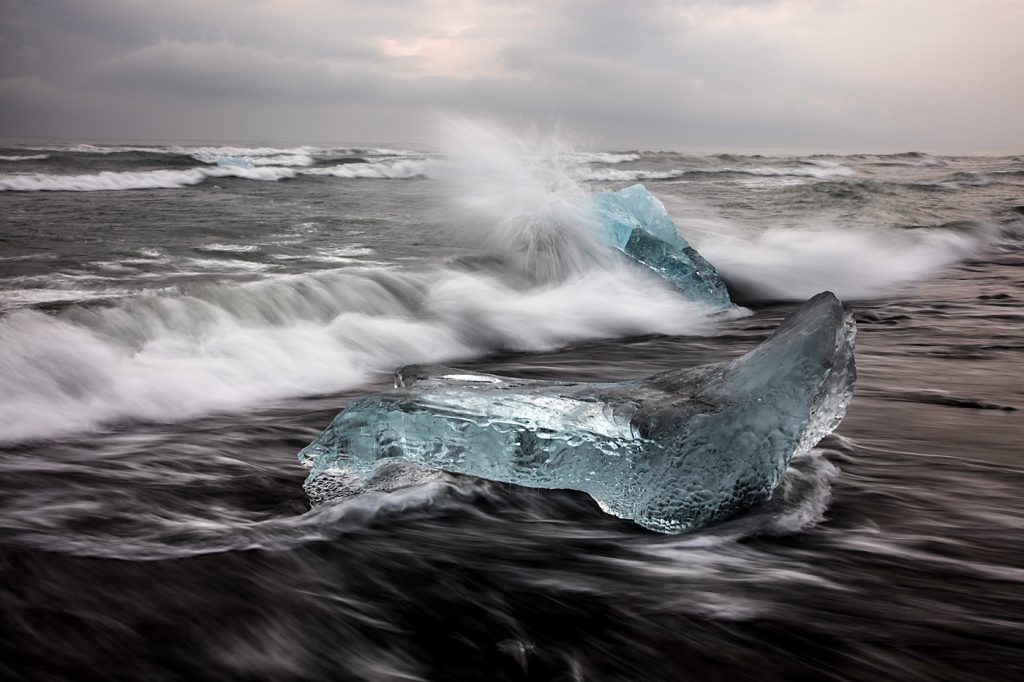
Location: Black beach opposite the Jokusarlon Glacier Lagoon, Iceland.
Goal: Convey the beauty of the grounded icebergs – gems of frozen water – framed by the slow and graceful moving surf and positioned against a background of powerful, crashing waves.
Thought process: Compose a scene that includes the icebergs, the beach, the waves and the sky. Experiment with different slow shutter speeds, from 1/60th second to several seconds, to convey the power and beauty of nature. To steady my camera during the long exposures, a sturdy tripod is must (which is why I choose RRS gear).
Behind-the-scenes story
I took my Jewels of the Sea photograph on one of my Iceland photo workshops. The previous day, before we set out to shoot on the beach, I gave the workshop participants the assignment of trying to get an image of grounded icebergs framed by moving water – an image that captured the beauty of the Icelandic coast.
When we arrived on site, my focus was on helping the workshop participants, so I really did not get a shot I liked.

One workshop participant, David Recht, however, nailed the shot, which he showed me during our evening processing session. His black-and-white photograph inspired me to get a similar photograph the following day.
My Favorite Shot
I took dozens of photographs of the same scene from a single position that morning on the beach (see the screen grab of some of the other shots in the Outtakes section below). The opening image is my favorite shot for several reasons, the most important being the mood and feeling of the image created by an overcast sky, the beautiful jewels of ice, and the movement of the waves. I also like the movement of the incoming waves on the beach, the burst of water on the iceberg in the background, as well as the foreground iceberg that frames the background iceberg.
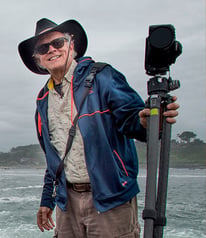
Logistic Tips
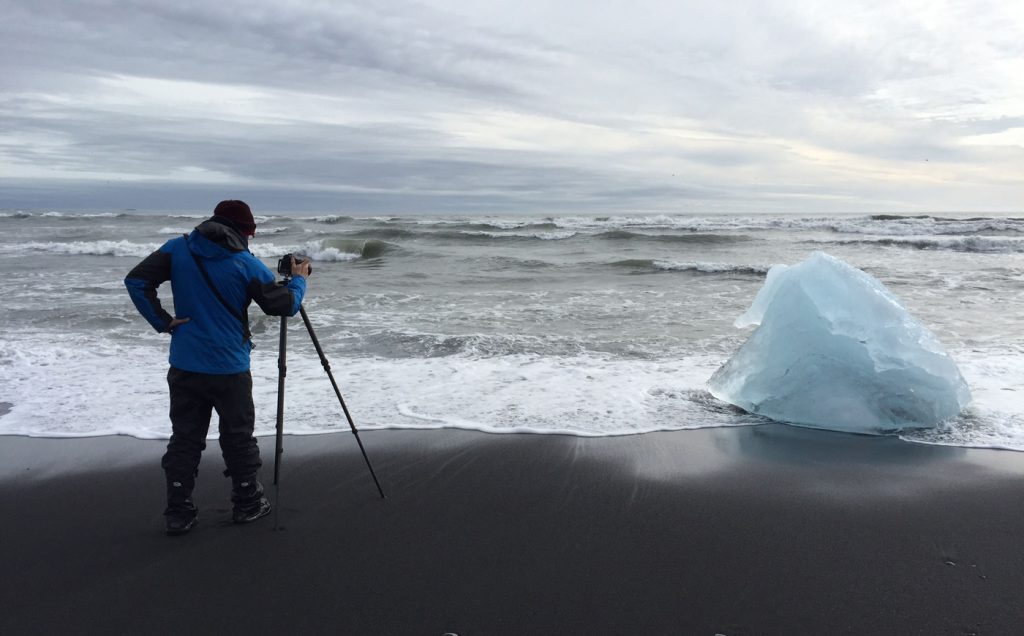
Here’s a behind-the-scenes shot my wife Susan took of me while I was photographing on the beach that morning, just down the beach from where I took my Jewels of the Sea photograph. I am wearing NEOS – waterproof, flexible and collapsible boots that fit over hiking boots and shoes. If you plan to shoot on the beach or in and around water, I recommend NEOS boots. They come in different sizes and heights, as well as insulated and non-insulated models. NEOS are available from http://OutdoorPhotoGear.com.
As you can see, I am using my RRS tripod and ball head. A quick and important tip: when you set up your tripod in the sand, release the small/thin legs first (as shown) – so there are no joints, which can get clogged with sand from the beach and surf.
When you are shooting on the beach, remember this important tip at ALL times: Never turn your back on the ocean. A “sneaker wave” may sneak up on you and get you and your camera drenched, or even knock you and your camera over.
Basic Moving-Water Photography Tips
When shooting in the sand, unscrew or unlock the smallest legs of your tripod first and place the feet of those small legs in the sand. If you unscrew/unlock the largest legs first and place them in the sand, sand will get in the joints of the smaller legs, which can cause screwing/locking/sticking problems. When you get back to your hotel room, shower with your tripod, legs extended, to remove sand and salt spray.
If your tripod is set up in the surf, pay very careful to tripod vibration, which you can feel by holding a leg of your tripod. The movement of the waves ebbing and flowing can cause your tripod to vibrate, as well as to sink slightly into the sand. During a long shutter speed setting, that movement would cause a blurry photograph. For a steady shot, shoot when there is no moving water around the legs of your tripod.
Wind can also cause tripod vibration, which can be exaggerated when a camera strap is attached to your camera. When shooting in the wind with your camera mounted a tripod, remove the camera strap for a steadier shot.
Wind and waves also equal salt spray. Always have a microfiber cloth handy to clean the front element your lens. If it’s very windy, it’s a good idea to have a plastic camera cover on hand to protect your camera.
Once your camera is set up, it’s time to shoot. Basically, you want to control/reduce the amount of light entering your lens so you can shoot at slow shutter speeds to blur the water. On bright days, that means using an ND (neutral density) filter.
The key to getting the desired effect is to experiment with different slow shutter speeds. What’s the ideal shutter speed? The answer is, of course, “It depends.” It depends on your desired effect (amount of blurred water), how fast the water is moving, and the direction in which the water is moving (incoming or outgoing). It also depends on which lens you are using and how close you are to the water – because the closer you are to the water, the faster it appears to move. For this image, I used a shutter speed of 1/6th second.
To capture subtle differences in the waves, set your camera on rapid frame advance, as high/fast as it goes. When you think you’ve got a shot, keep shooting – because everything looks good on a small screen.
Image Processing Techniques
Here’s my original raw file. Yes, it’s a bit dark and flat, but I intentionally underexposed the image. I did this to prevent the highlights from being overexposed and washed out, which is easy to do when you have lots of white areas (foam in this case) in the frame.
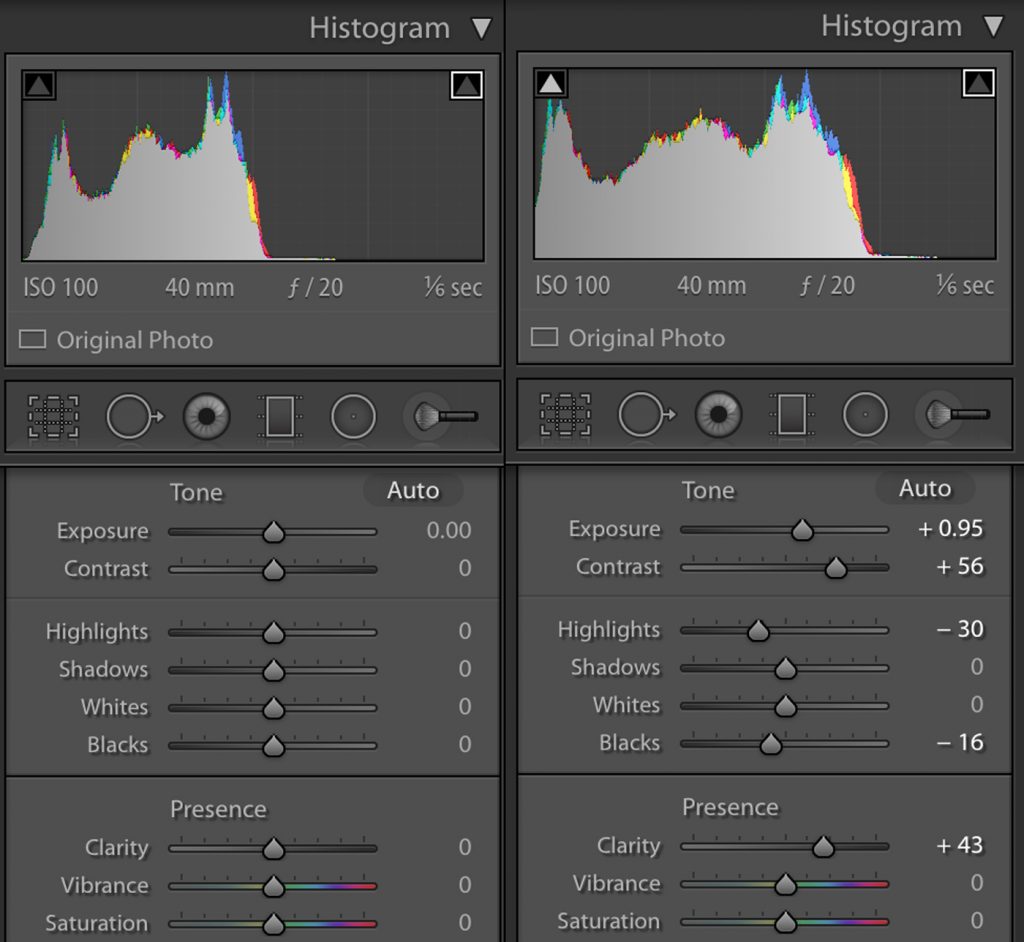
After opening my file in Lightroom, I only made some basic adjustments, because I was striving for a realistic looking mage, as opposed to an artistic impression of the scene.
These before-and-after screen grabs of the Lightroom Basic adjust panel show the adjustments I made:
• Increased the exposure slightly (note the change in the histogram);
• Increased the contrast – for a more dramatic image;
• Reduced the highlight – to maintain detail in the highlight areas;
• Boosted the blacks – for a richer image.
I also used the Clone Stamp tool to remove the blurred sea gulls in the sky, which looked more like dust spots than flying birds. As a final step, I sharpened the image. Sharping adds apparent contrast to an image.
Here’s the result of my Lightroom adjustments. I like the effect, but I still wanted a more dramatic image. I felt, in part thanks to David, as though black-and-white was the answer.
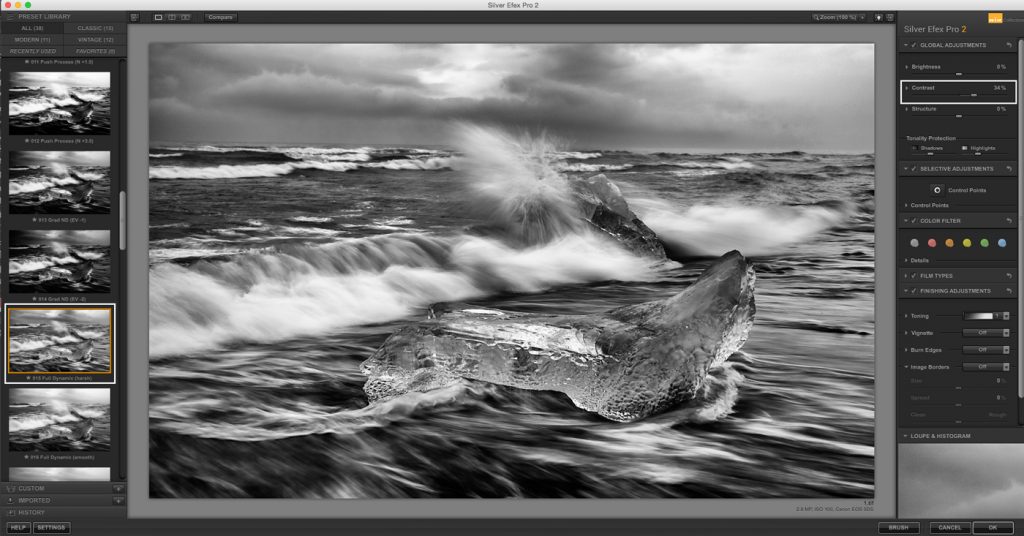
From Lightroom, I opened my image in Nik Silver Efex Pro (Lightroom > Photo > Edit In > Nik Silver Efex Pro). Once in Nik, I applied the Full Dynamic Range/Harsh filter, then boosted the contrast a bit to create a greater sense of drama in the image. I experimented with different color filters, which change the tones and contrast of an image. In the end, I decided to go with no filter, which is the default setting. The opening image is the result of that final enhancement.
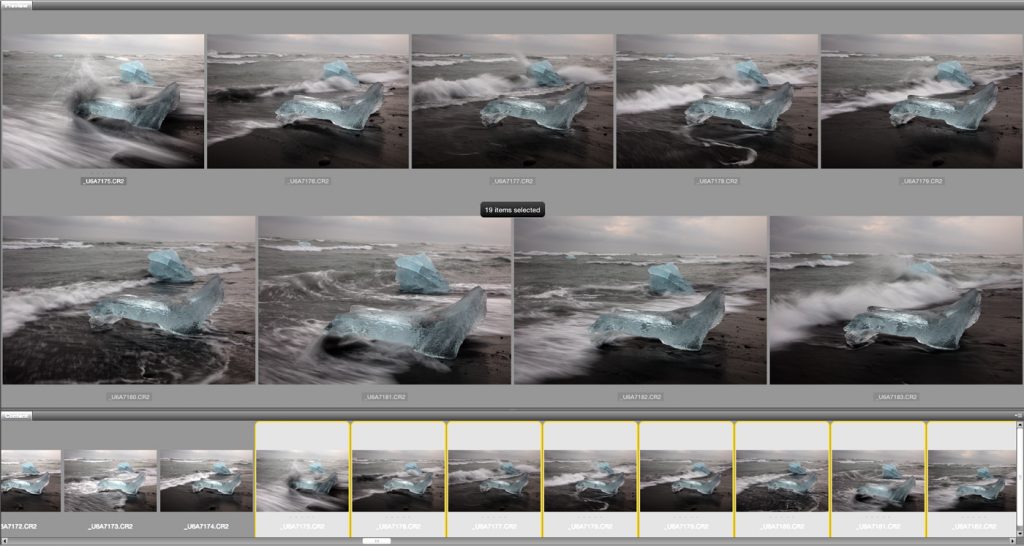
Here’s a look at some of the other RAW images from the shoot. In my opinion, the image I selected had the right combination of water movement and crashing waves to make that shot my one keeper.
Closing Thought
When you are shooting with other photographers, watch what they are doing, even if they are not pros. You may just be inspired to create a gem, or jewel, of an image.
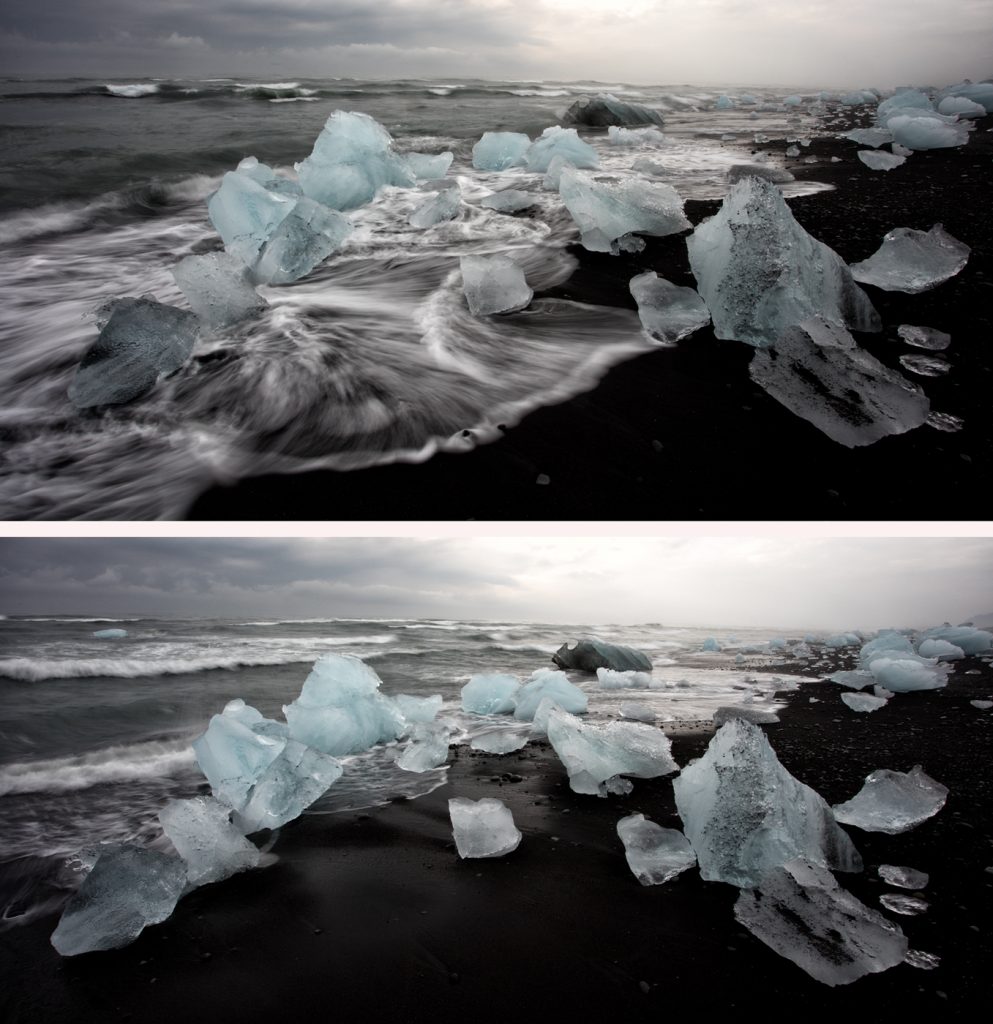
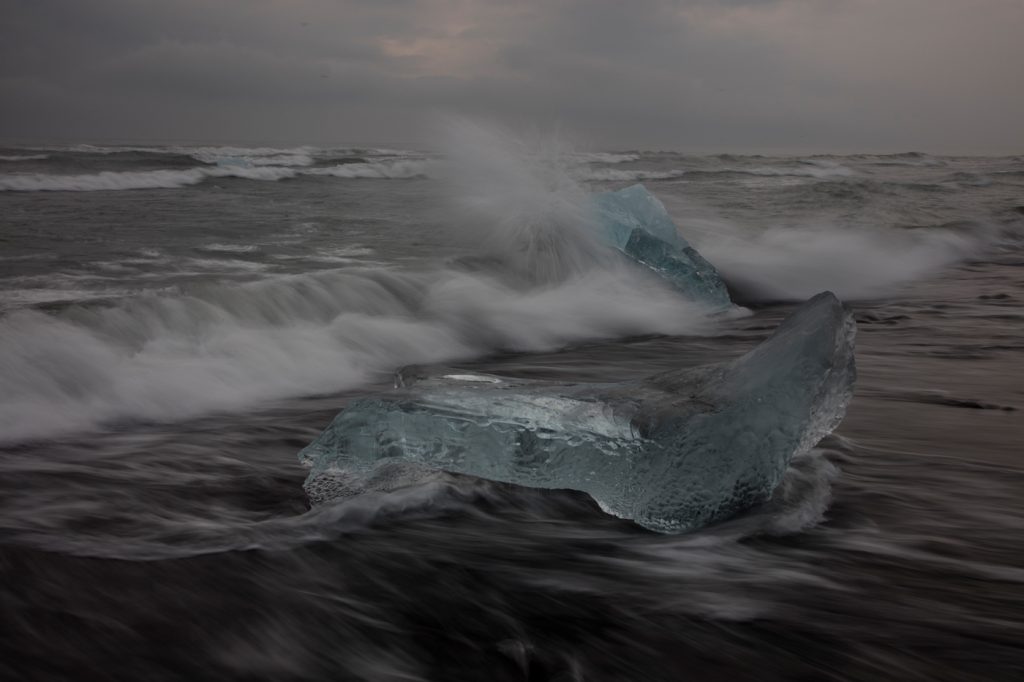
Here’s a with-and-without (with and without the surf in the foreground) pair of images that illustrates one of the main reasons for shooting by the sea: including moving water in your picture for an image with impact. This pair of images, taken a few minutes after I took the opening image, illustrates something equally important: timing is everything.
Tech Info for Opening Image
Camera: Canon EOS 5Ds
Lens: Canon 24-105mm IS lens..
Tripod: Really Right Stuff tripod and Really Right Stuff ball head.
Camera settings:
• Rapid frame advance – to capture the subtle differences in the flow and position of the waves;
• ISO 100 – for shooting at long shutter speeds, f/20 – for good depth-of-field), 1/6th second – to blur the movement of the water. EV -0.67 – to prevent highlights from being washed out.
• Manual focus – to maintain sharp because moving waves could change the focus setting, as well as slow down the auto focus process;
About Rick Sammon
The intrepid and tireless team of Rick & Susan Sammon have produced 38 books and also shoot online classes for KelbyOne. They also lead photo workshops around the world, from Alaska to Antarctica.
“I use RRS tripods and ball heads in front of and behind the camera – because the gear has never let us down.”
Rick Sammon
http://ricksammon.com/