It’s great to be posting here again on the Really Right Stuff blog. I think you will find this post – and my future posts – fun and informative . . . because I like to make learning fun.
The idea in this series is to show you what I call the “evolution of an image,” going from idea to image. I’ll show you my before and after shots, and include photo processing info too.
Location: Gullfoss, Southwest Iceland
Goal: Make a photograph that captured both the beauty and force of Mother Nature.
Thought process: Use a wide-angle lens to take in as much of the scene as possible, use a slow shutter speed to convey the power of the fast-moving water, and use a foreground element to give the viewer of the photograph the feeling of “being there.”
Behind-the-scenes story
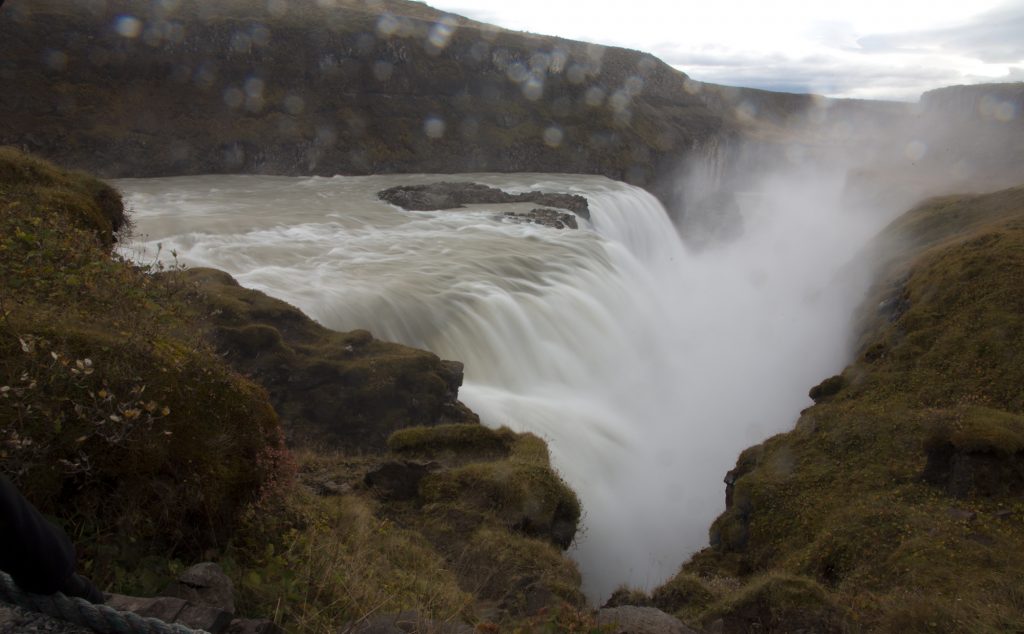
When we arrived at the Gullfoss (Golden Waterfall), the wind was strong, as per usual, and the air was filled with a thick mist created by the wind blowing over the water. This photograph, taken earlier that day near the entrance to the waterfall, shows the effect of water droplets on my lens.
The key to getting a clean shot with all the mist is to shoot fast and keep the front element of my lens clean with a micro fiber cloth. The mist also meant that I could not change lenses and that I really needed to pick just one location to shoot from.
Wearing a rain jacket and rain pants, with my camera covered in a plastic rain cover, I walked with my tripod over my shoulder, along the slippery path to the beginning of the falls. The previous year I had tried to photograph in the same location, but the mist and wind were too strong to takes pictures.
At the end of the path, I picked what I thought was the best location to capture the beauty and force of Gullfoss. Quick tip: when you are at any location, ask yourself, “If I could take only one shot, what would it be?” The answer to that question will help you consider the best composition and the best lighting for a scene. It will also cut down on the number of photographs you take and result in a higher percentage of good photographs – because you will be thinking more than photographing.
After composing my photograph and adjusting my camera settings, I pulled out my micro fiber lens cleaning cloth and began wiping the mist off the front element of my lens. The best technique for cleaning lenses is to start in the center and, in a circular motion, wipe the moisture toward the circumference of the lens.
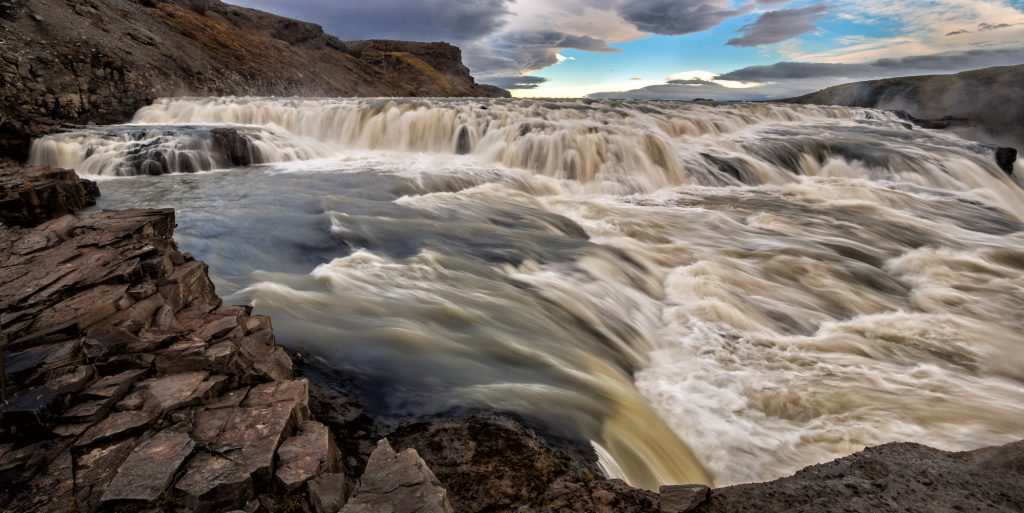
When there was a lull in the wind and mist, I took one shot – the shot that opens this chapter. Turing my back to the wind, I looked at the image on my camera’s LCD monitor and saw that one was virtually spotless.
I thought that because I got the best in-camera exposure (moving the histogram to the right as far as possible without getting a highlight alert warning) I’d be okay when it came time to making an image in Lightroom that showed good shadows and highlight detail. As a backup, however, I though I’d try an in-camera HDR image.
Setting up camera, and cleaning my lens again, I took an HDR sequence (EV 0, EV +2 and EV -2). Here’s the final in-camera HDR image. Yes, the tonal range was captured, but the image was far from what I knew I could pull out of a single RAW file in Lightroom, and far from the creative effects for which I was looking.
The wind picked up, so I packed up. I was out of there. My camera was dry, but I was dripping with water and could hardly see through my mist-covered glasses.
Basic In-camera Histogram Photography Tip
You’ll find basic tips for photographing moving water in the “Go with the Flow” chapter. Here I’d like to discuss how to get the best in-camera exposure.
Basically, you want to increase your exposure so that your histogram is moved over to the right as far as possible – without getting an overexposure warning (indicated by the highlight alert feature on your camera).
We move the histogram to the right because most of the information is on the right. What’s more, when you underexpose, you run the risk of getting more noise in shadow areas when you open up them up.
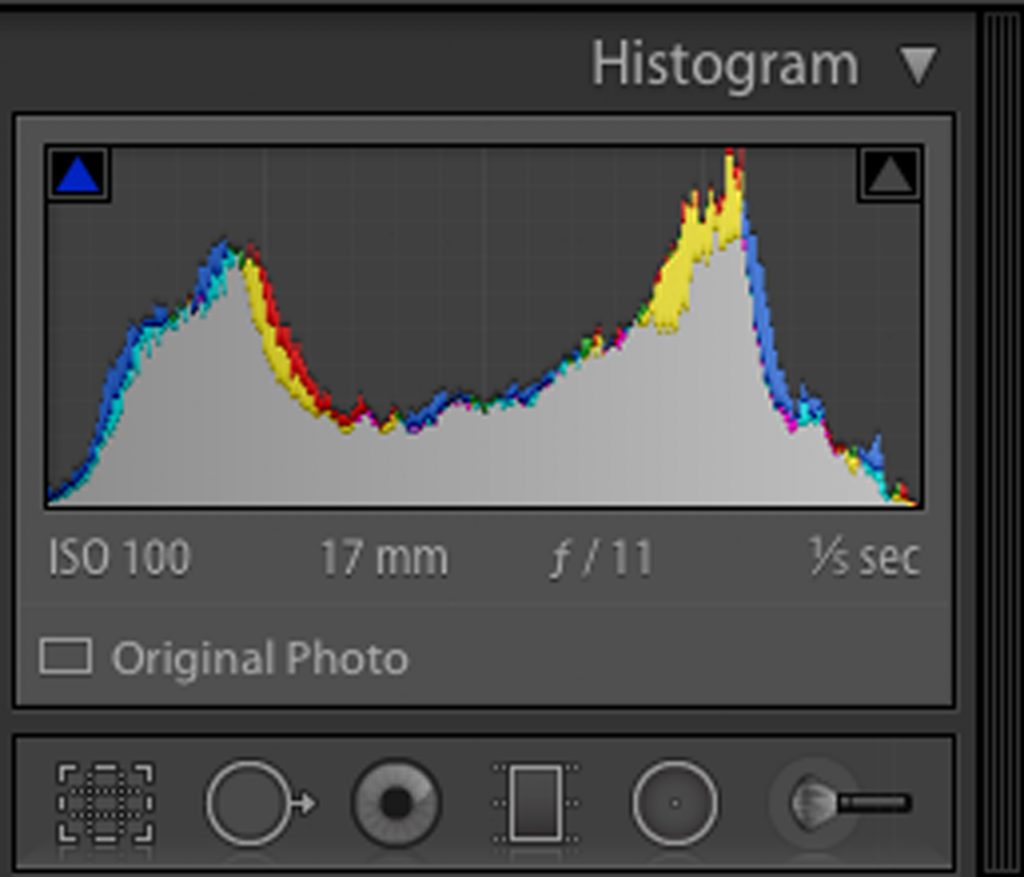
Here is the histogram (from Lightroom but it’s the same for the in-camera histogram) for the opening image. As you can see, it’s moved over to the right as far as possible without showing a spike on the right, which would indicate overexposed areas of an image.

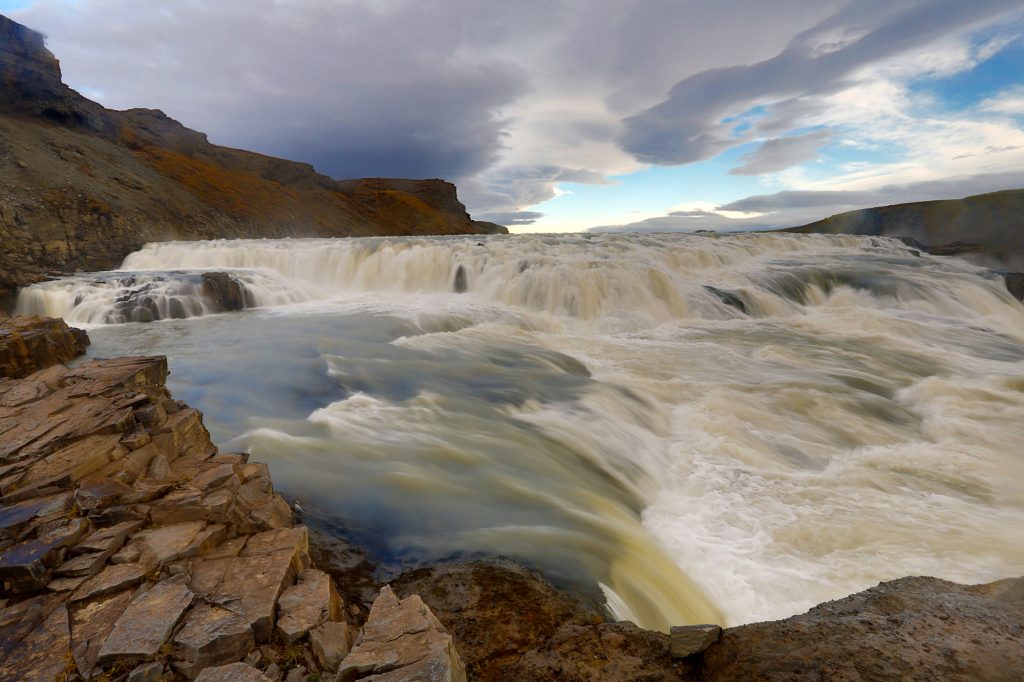
Here is the original image from which I created the opening image. At first glace, it might look too bright. But it’s actually the best in-camera exposure. The important concept here is not to judge the best exposure by how it looks on the back of your camera, but rather by the histogram.
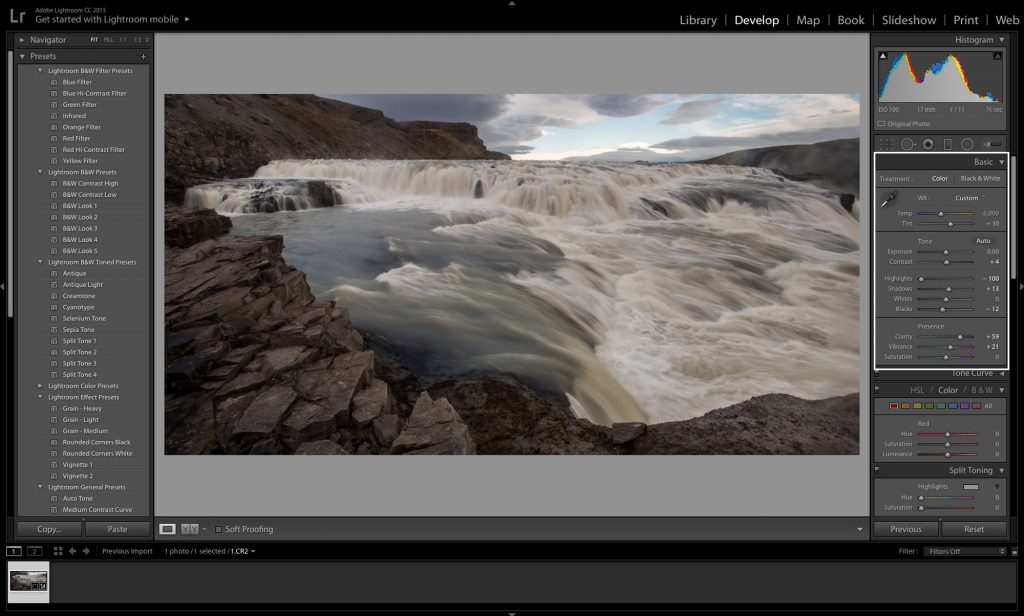
Image Processing Technique
In Lightroom, after cropping my image (for more impact), I made the following adjustments:
• Reduced the Highlights – to preserve detail in the sky and water
• Opened up the Shadows – to better see the rocks in the foreground
• Increased the Blacks – for an image with more drama
• Increased the Clarity – for an image with more details
• Used Dehaze – for a clearer view of the scene
I thought I was done with image processing technique, until I zoomed in on the image and looked more closely for water spots.
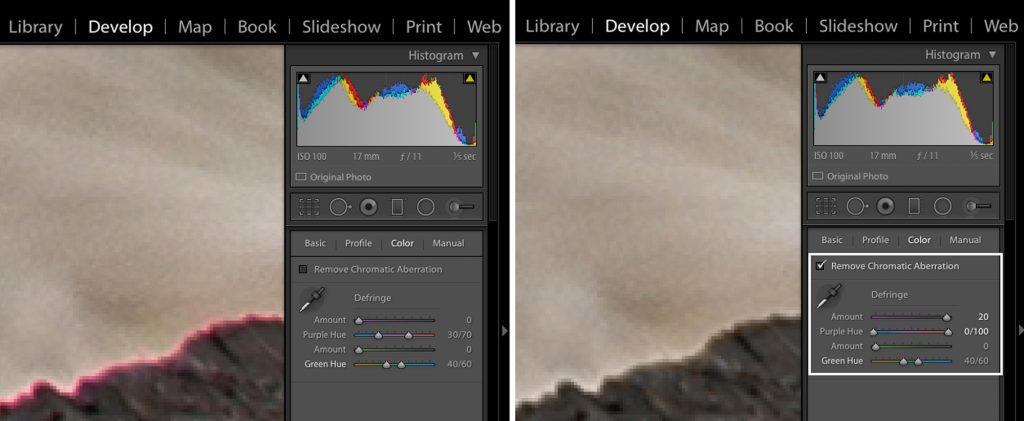
While zooming in, I noticed a chromatic aberration – the strange band of color you see in the screen grab on the left – where some of the rocks met the water. That was a quick fix in Lightroom by using the “Remove Chromatic Aberration” feature – as illustrated by the screen grab on the right. The main tip here is to use the magnify feature in Lightroom: look for elements you don’t want in your image.

Unexpected Shot
I was feeling cold, very wet, and tired on my way back to the parking lot. I thought I was done shooting. But then I noticed a section of the falls were slightly back-lit. I set up my tripod and took a quick shot. There wasn’t much color in the scene, so I converted my color file to a black-and-white image in Nik Silver Efex Pro,
Closing Thought
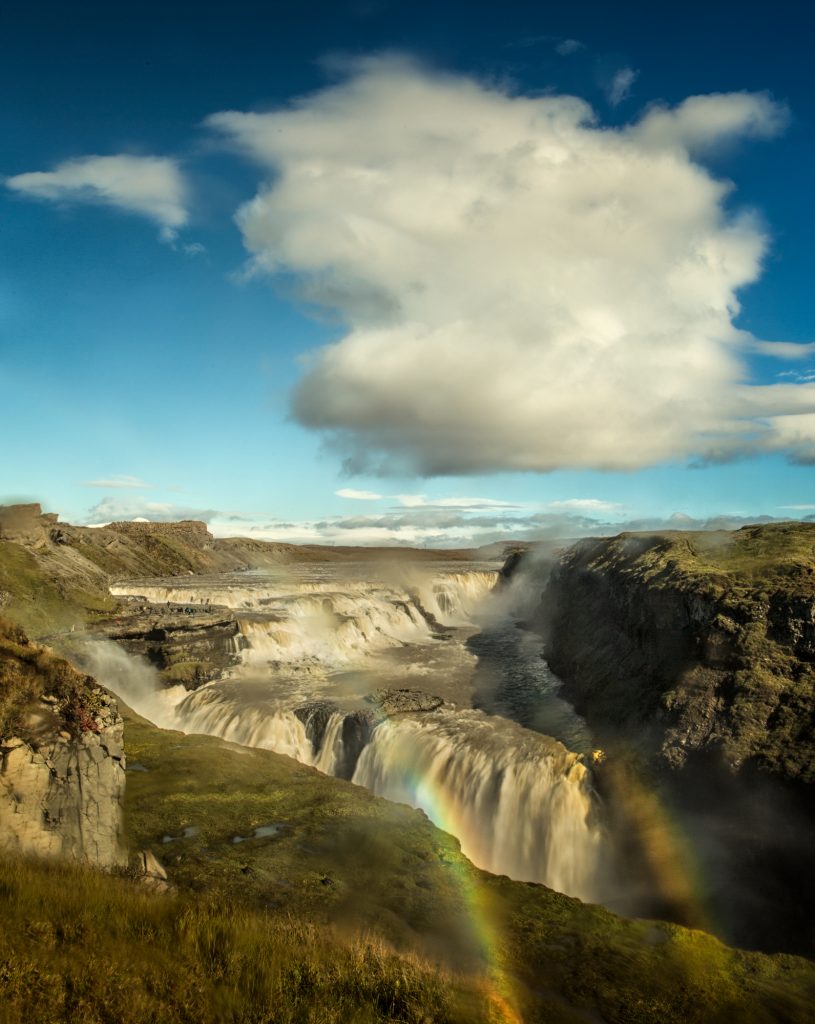
Just in case you were thinking of why this waterfall is called the Golden Waterfall, it’s because when the sun is shining, and there is lots of mist in the air and the golden light creates a rainbow – sometimes even a double rainbow. I took this image on a previous trip to Gullfoss.
Tech Info for Opening Image:
Camera: Canon 5D Mark III
Lens: Canon 17-40mm lens @ 17mm
Camera settings:
• Manual focus – set to 1/3 into the scene to get good depth-of-field;
• ISO 100 – so I could shoot at a slow shutter speed, 1/5th of a second – to blur the moving water, f/11 – for good depth-of-field.
About Rick Sammon
The intrepid and tireless team of Rick & Susan Sammon have produced 39 books and also shoot online classes for KelbyOne. They also lead photo workshops around the world, from Alaska to Antarctica.
“I use RRS tripods and ball heads in front of and behind the camera – because the gear has never let us down. Rick Sammon
http://ricksammon.com/