Dark Field Illumination with Focus Stacking
Heather Angel
The great thing about macro photography is that you have complete control of the lighting within a limited specific area.
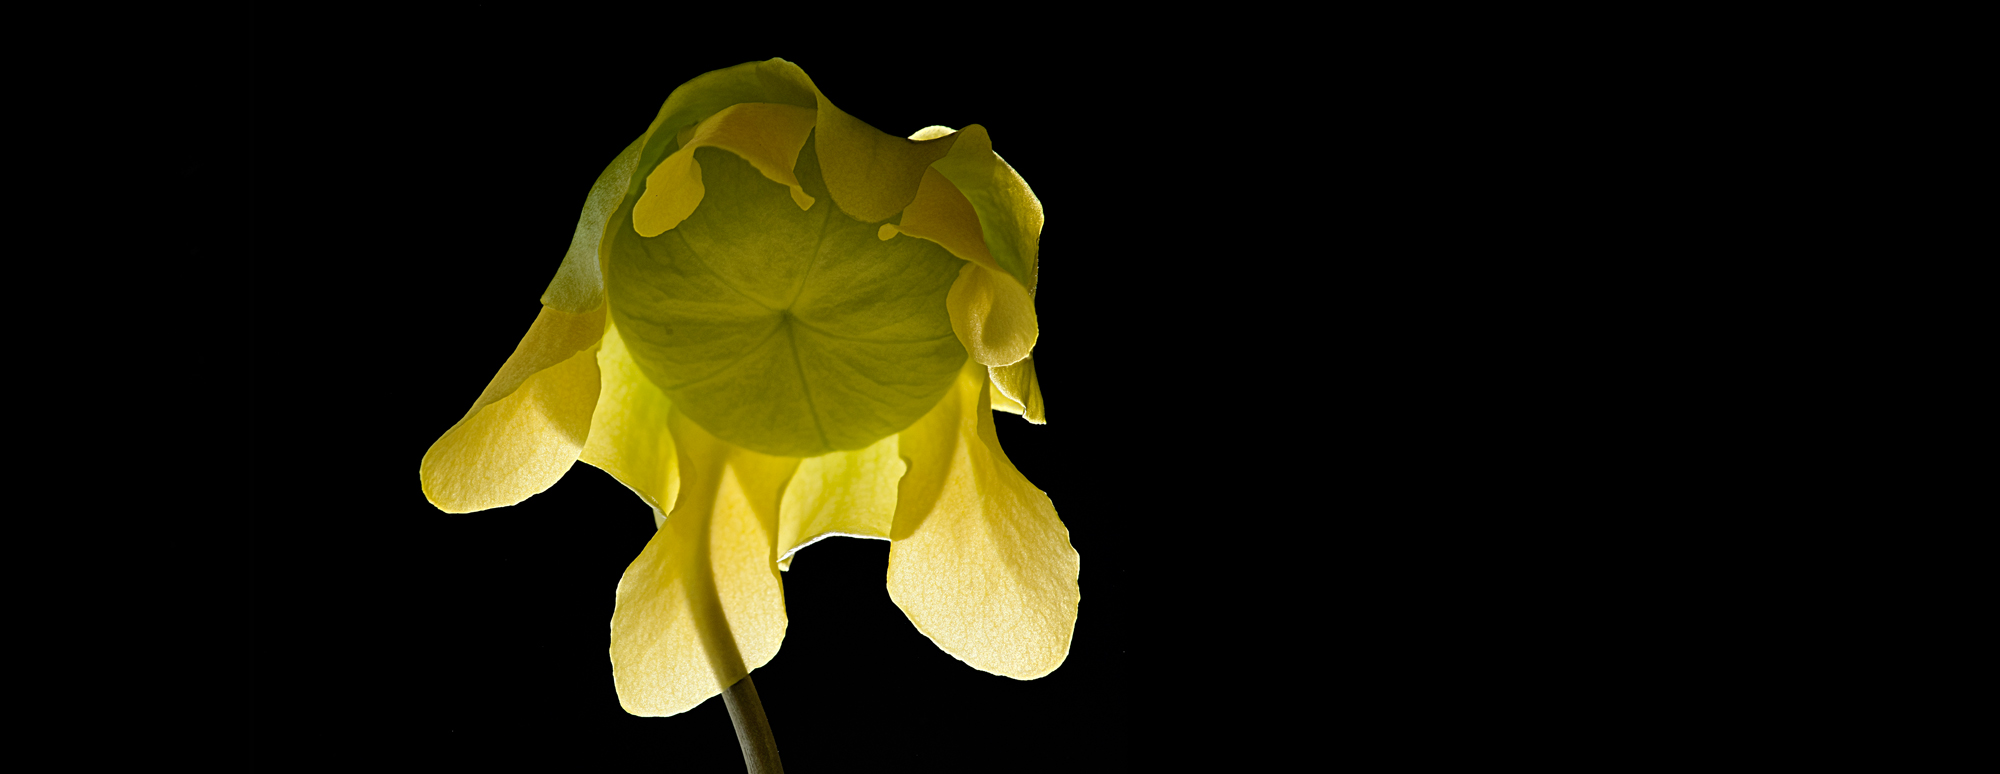
Translucent plankton comes alive when viewed down the microscope using dark field illumination (DFI). Positioned above an unlit background, the subject is lit from behind so that it appears to float in space. Long after I switched from working as a marine biologist to a wildlife photographer, I realized that DFI would be a perfect way to dramatically light translucent leaves and flowers.
Shortly after I bought my Nikon D4 camera, Nikon Pro (Europe) magazine commissioned me to write an article on my macro work. They wanted to know which ones were taken with the D4. At that stage, only one shot was relevant, so they asked me to shoot something especially for them.
Since time was very limited, I decided the best thing to do was to set up a flower in my studio, where I could control the lighting independent of the weather. I made a quick call to my local florist to check if they had some pincushion flowers in stock. Having photographed them before on a lightbox, I knew the translucent white and green bracts come alive with backlighting. This I thought was a wonderful opportunity to test out DFI using my Nikon i-TTL flash units.
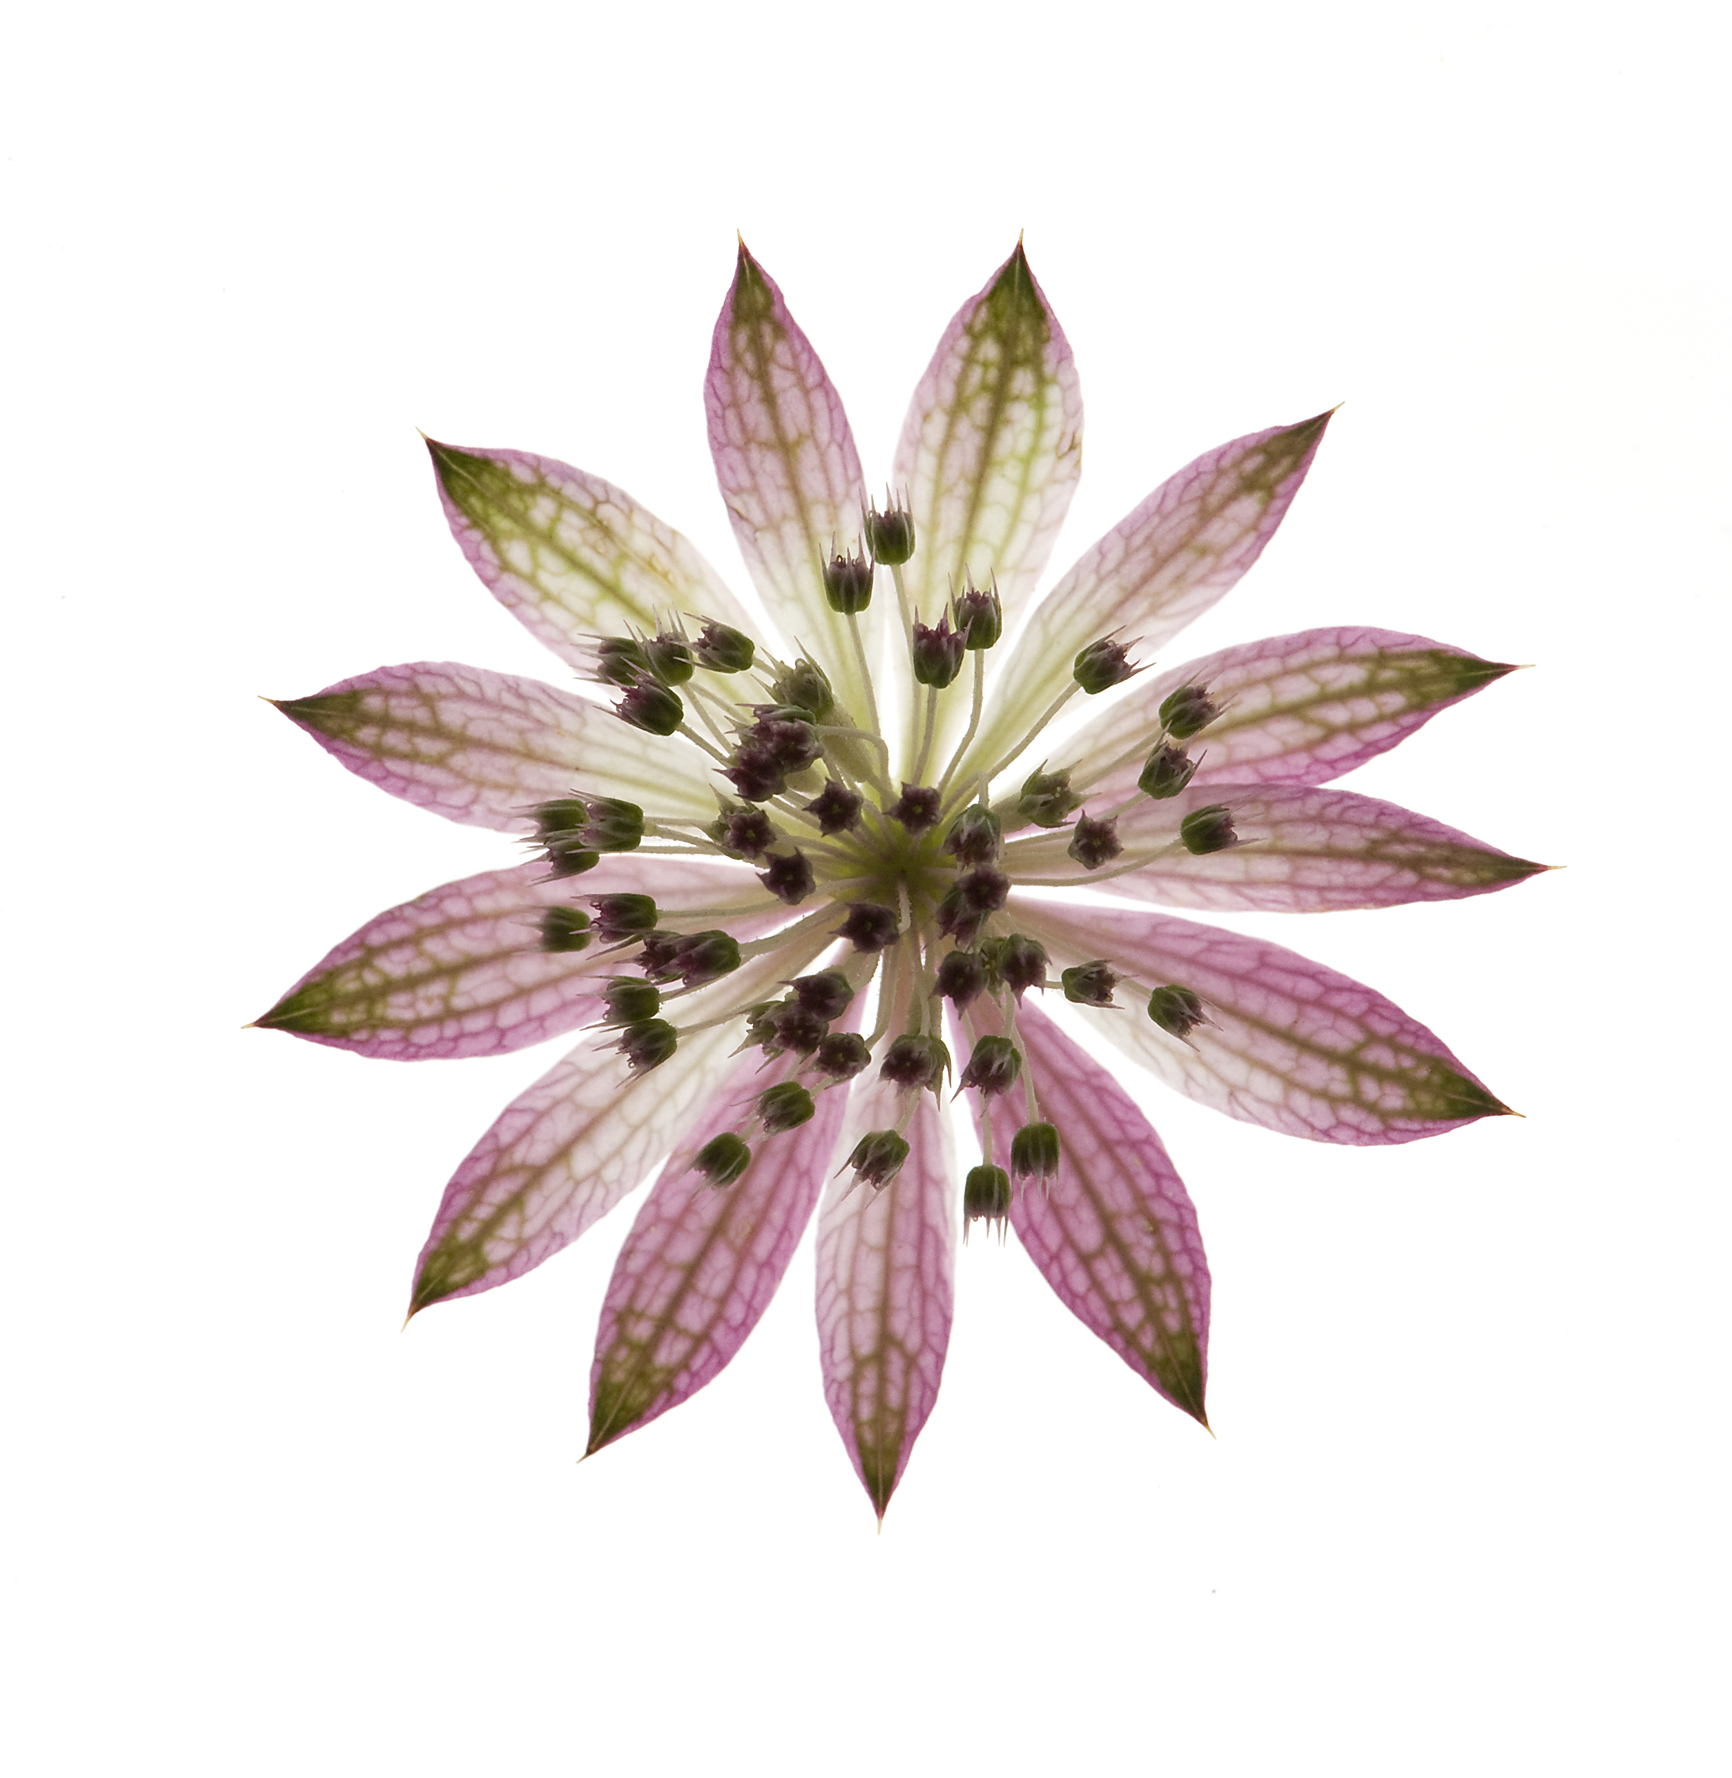
A cultivated pincushion flower Astrantia with the outer bracts tinged pink, backlit on a lightbox.
Essentially, the subject is raised up from a table on a rectangular piece of clean glass that’s supported beneath at each end by wooden blocks or a few books. Directly beneath the middle section of unsupported glass a piece of black velvet is laid on the table.
Two small Nikon macro flash units (SB-R200) are positioned beneath the glass and directed up towards the center of the glass and the subject. I checked that there was no risk of either flash shining onto the front lens element causing flares. A lens hood helped mitigate this and black paper snoots fixed around each flash reduced the risk by creating a narrower beam.
After firing off a quick shot to check the exposure, I then opted to take a focus stack to ensure all parts of the flower were in focus. This post-processing technique, extends the depth of field using a series of focus ‘slices’ by gradually moving the camera closer to the subject in even increments, like a CT scan. It is particularly useful for three-dimensional flowers, fruits, and insect faces; when no amount of stopping down the lens would get everything in focus. It can also be useful for landscape photography, when much fewer exposures are required.
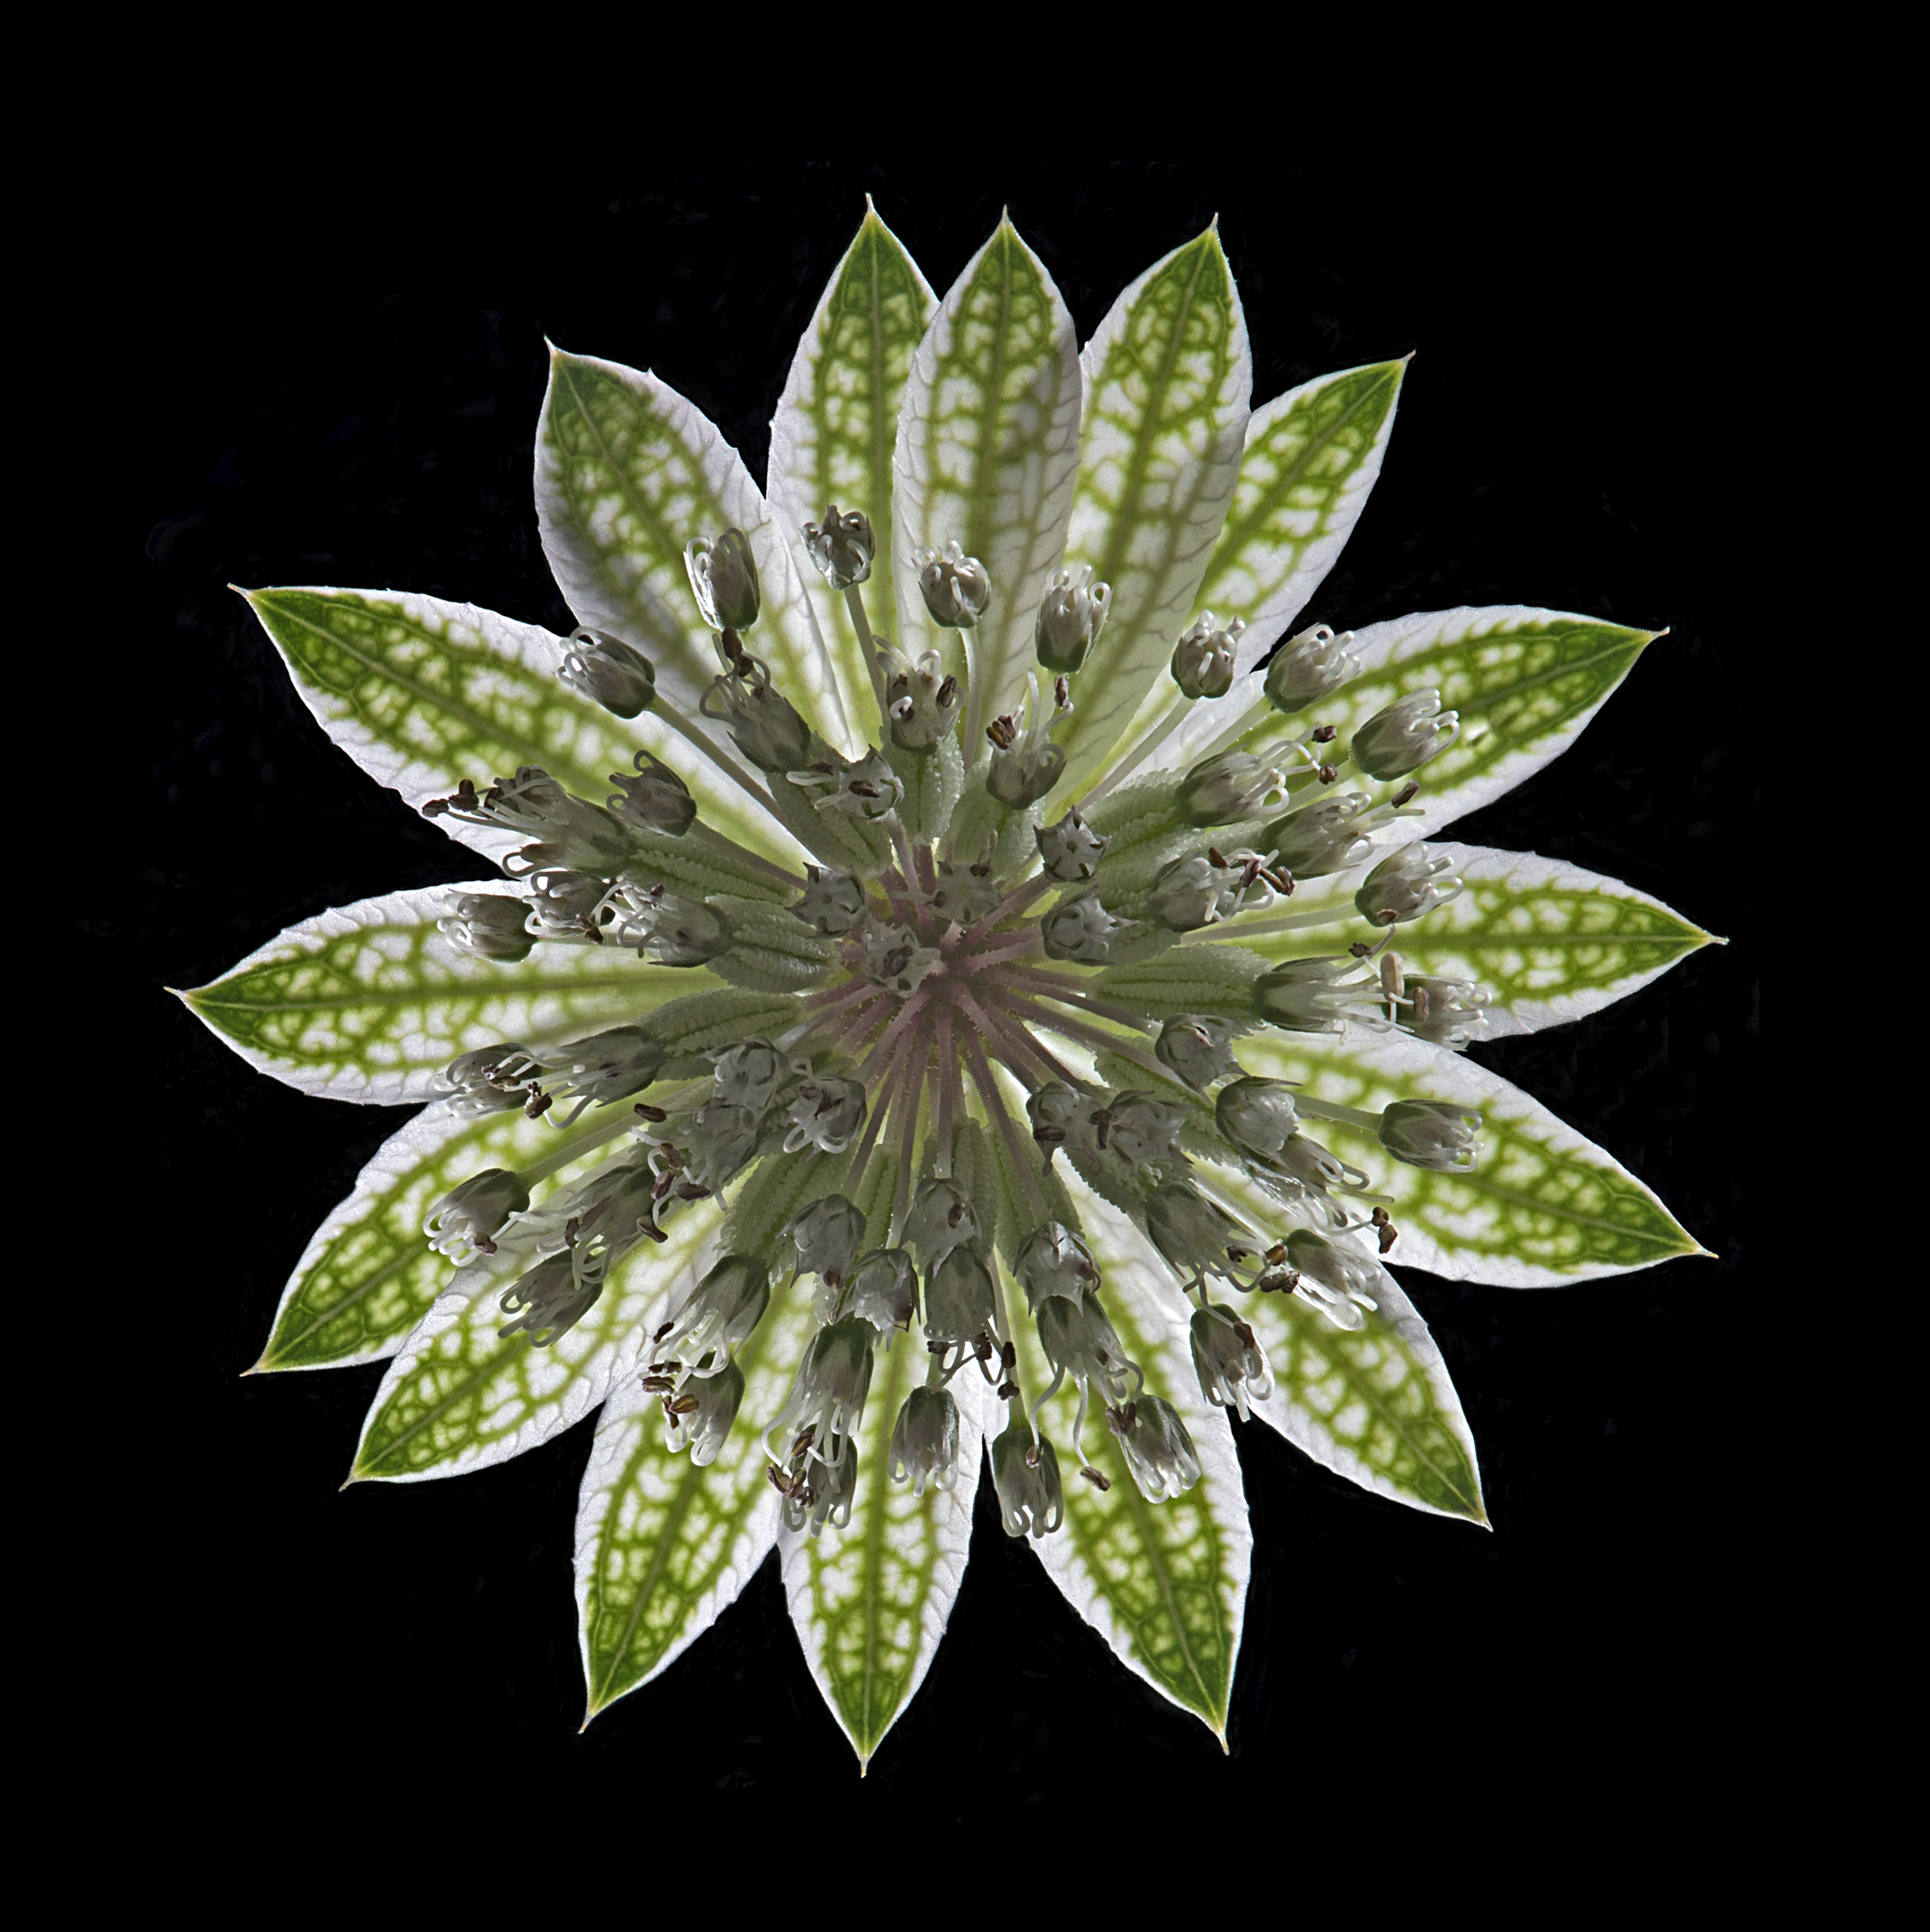
Pincushion flower Astrantia lit by dark field illumination and taken as a 10-exposure focus stack shows the mass of tiny florets surrounded by the ring of green and white bracts.
• Subject must be static
•Lighting needs to be consistent
• When composing the first shot make sure plenty of space is left around the subject so there is no risk of cropping in on it as the camera is moved forward
• Use manual focus to focus on the part of subject nearest the camera
• Use the RRS Macro focusing rail to advance camera forward in equal increments
• DO NOT REFOCUS THE CAMERA after the first exposure when using a focusing rail
Use manual focus, not AF, to focus the camera on the part of the subject closest to the camera. After each shot, the camera is advanced in equal increments. This can either be one full turn (for larger subjects) of the advance knob or half a turn (for true macro subjects). There is a millimeter scale on both sides of the rail, but I find it easier marking the advance knob with a thin self-adhesive strip that is left white on one end and painted red at 180º opposite. Then by starting with a red strip at the top of the knob and rotating the focus knob one full turn (red to red or white to white) the advance will be the same for each exposure in the stack while white to red or red to white advances the rail by half a turn. You cannot mix full and half turns in the same focus stack.
Without doubt, the RRS B150-B macro focusing rail is the best engineered rail of any I have used and I have taken literally hundreds focus stacks with mine. The rail was attached to a RRS BH55-LR Ballhead and the camera fixed to the rail via a RRS BD 5–L plate. The right-angle plate provides a speedy way of changing from a horizontal to a vertical format. The camera was set-up directly overhead the flower, from which I had cut off the stalk before laying it on the glass.
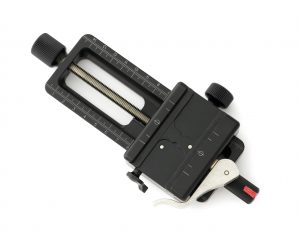
B150-B macro-focusing rail made by Really Right Stuff, shows my red strip on the advance knob. The white strip is out of sight 180º below for gauging full and half turns.
Crisp and clearly defined focus stacks work only if the lighting remains constant – whether you use window light, LED lights, or flash units with or without reflectors or diffusers. A tripod ensures no risk of camera movement during the stack whether working indoors or outside, but it won’t help on a windy day because the images will not blend together.
After the stack is complete, the images are downloaded and merged using a software program. I use Zerene Stacker; both this and Helicon Focus have a downloadable 30-day trial. Both now accept RAW files.
The number of frames needed for a stack will vary, depending on the three-dimensionality of the subject is and its size. This flower only needed 10 frames, whereas a flower with a deep corolla may need 50-70.
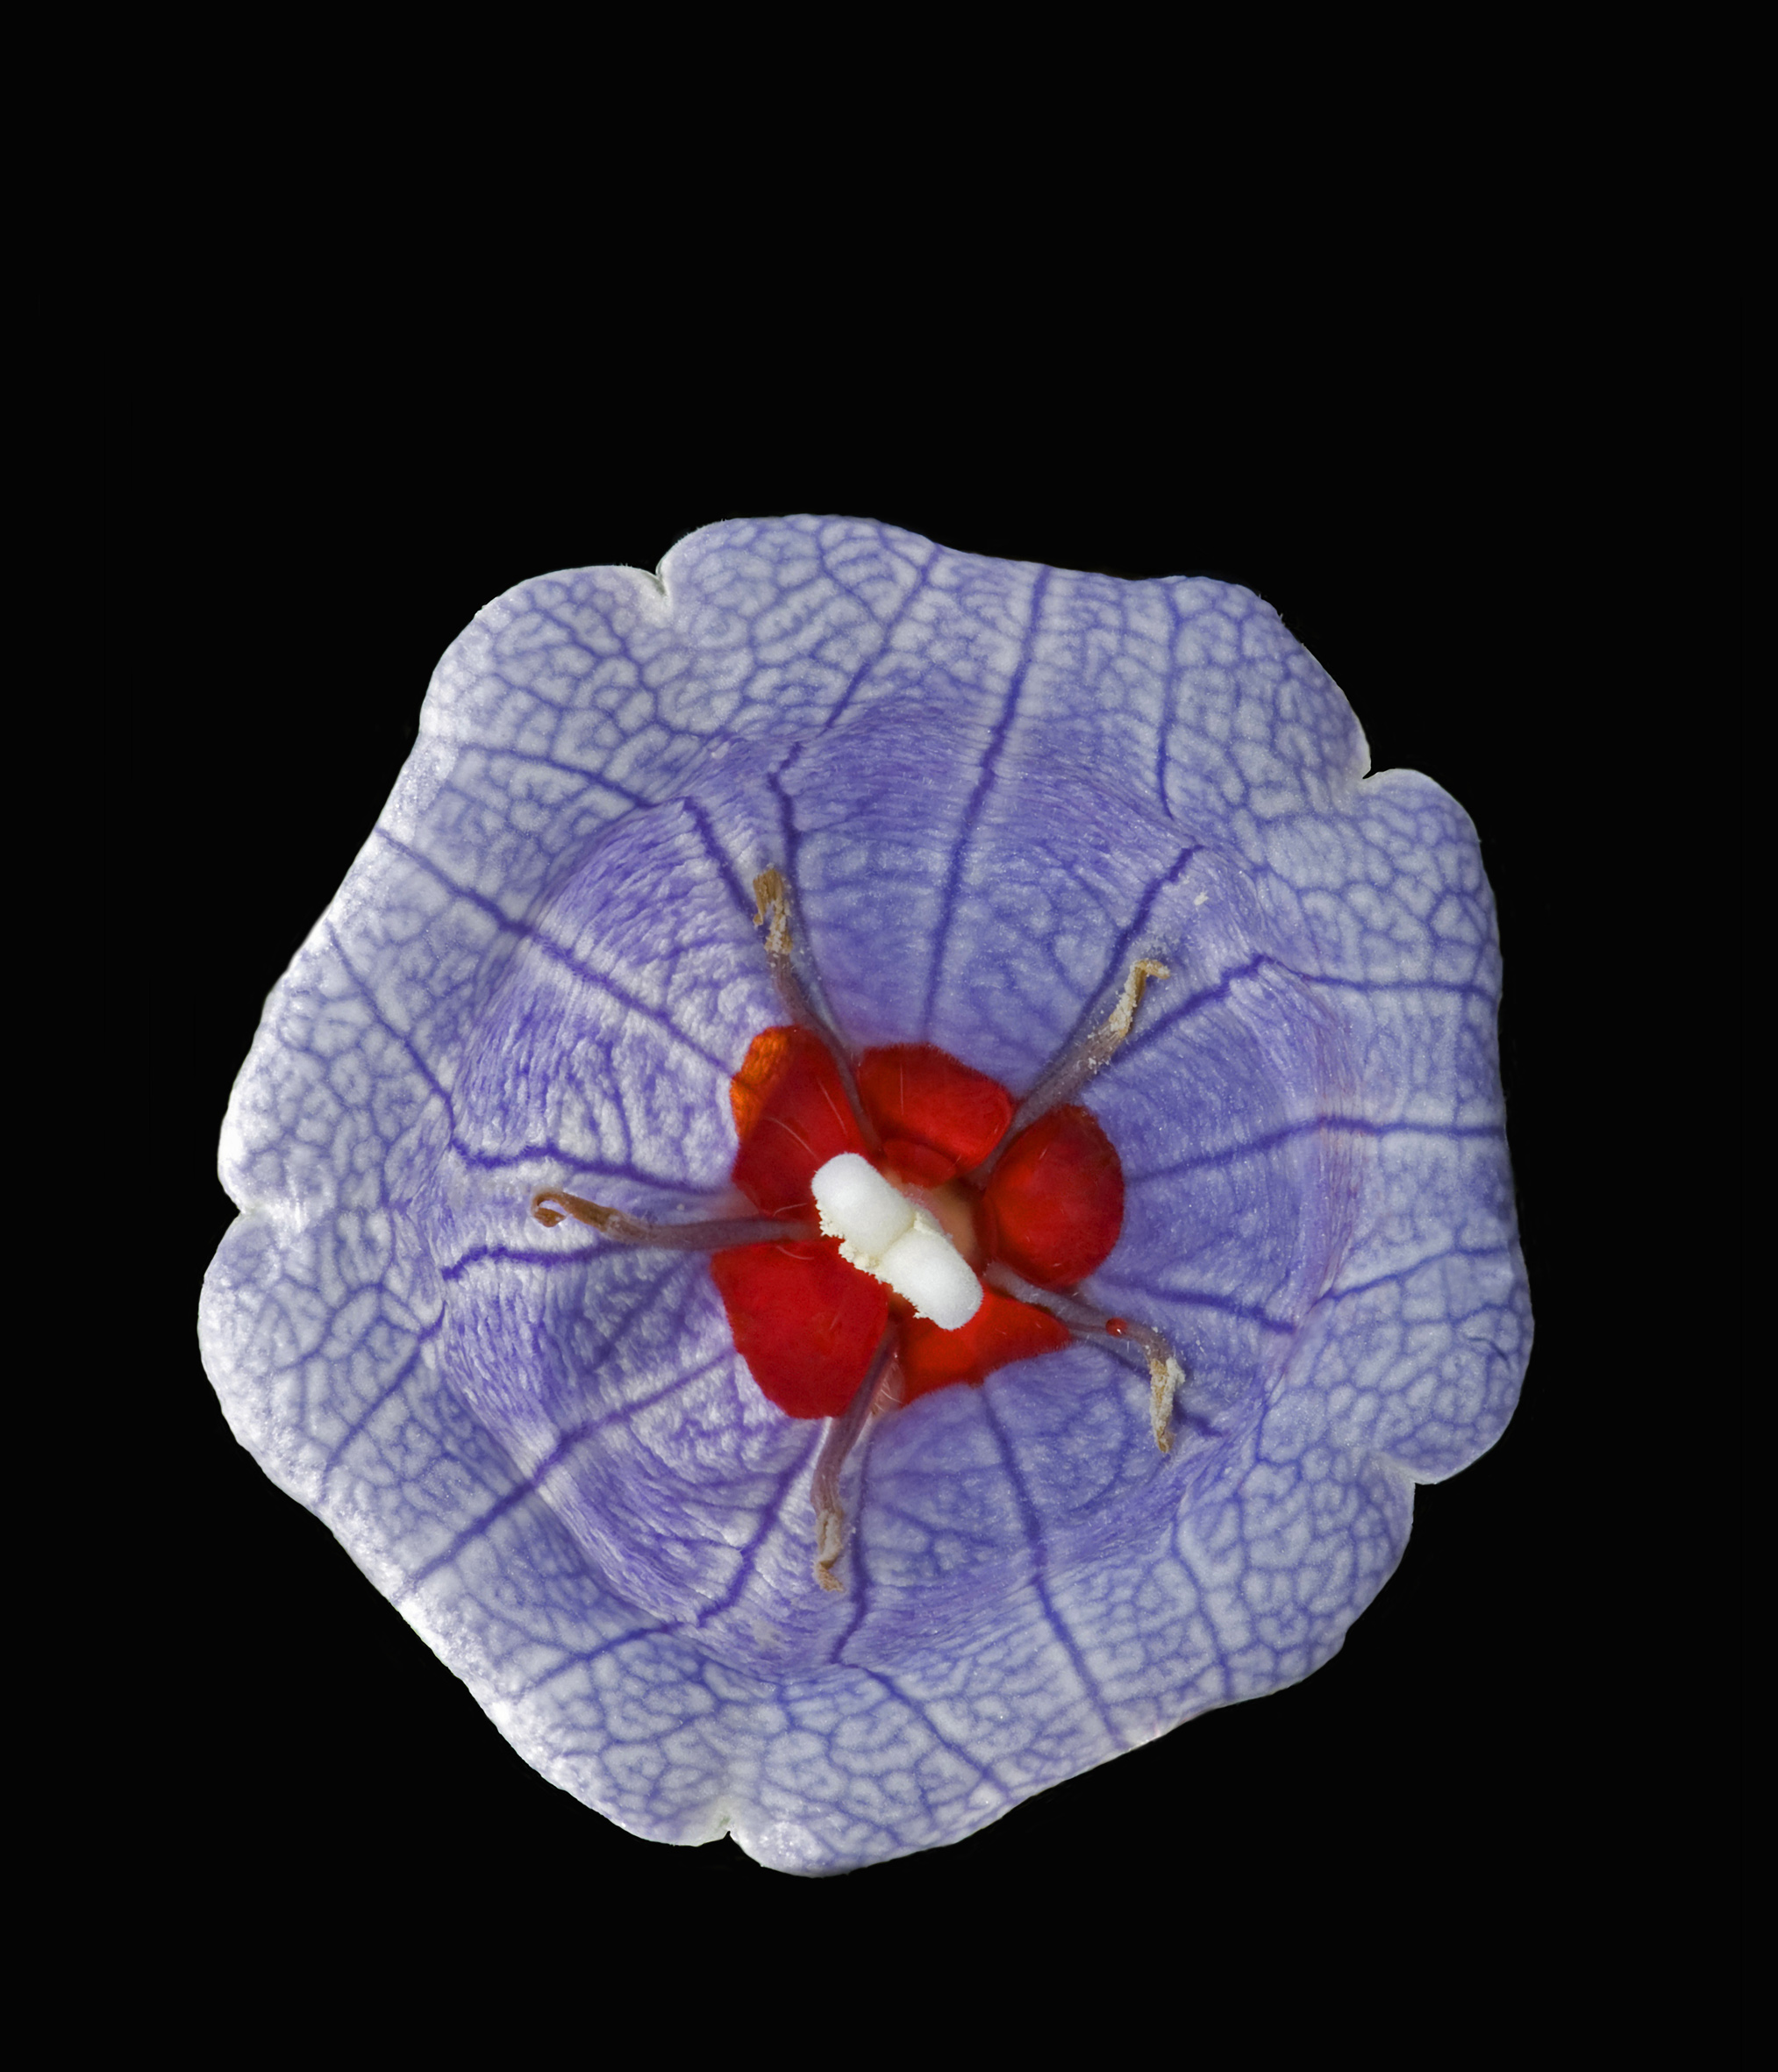
This focus stack of the Mauritian bloody bellflower required 15 exposures to ensure the depth of field extended from the upper lobes to the rare red nectar in the base. Just a few plants remain on steep cliff sides in Mauitius. It may be pollinated by the Mauritain day gecko, which is known to feed on colored nectar in another Mauritian endemic plant.
The advantage of using a black background is that the crop can be changed into any format from rectangular, vertical, square or panoramic simply by cropping one or more sides or extending any side. The original shot allowed for more negative space above a vertical for magazine or book titles. Here, the black area has been adjusted to create both a square image and the banner.
One word of warning – you may find focus stacking can become rather addictive!