Using the amazing PG-01 lightweight vertical pano head and the PC-LR pano clamp
Written by: Scott Stulberg
After using the beautifully built PG-02 vertical pano gear for years, using it on my multi-row panoramas and so many of my Milky Way and night sky panoramas spoiled me. It’s built so well it is often too big to carry in my backpack. I always wished that I could have something equivalent that would be much smaller and my prayers were answered when I talked to Joe Junior at Really Right Stuff.

I told Joe of my dilemma, and he told me they made a vertical pano head that might be exactly what I was hoping for. He thought the PG-01 would be exactly what I needed. He wanted me to try it out and give him some feedback. When it arrived in a few days, I was absolutely amazed at the size and the weight. I knew this could possibly be the answer to having a vertical pano head with me on all my travels and workshops, especially to faraway countries. Shaving ounces whenever possible is key to carrying a lighter backpack and with this beautiful design I could not wait to try it out.
I think aside from the lightweight and smaller design, the most amazing part of this piece of gear is the built-in panorama head. This sleek design eliminates the need for a separate panorama clamp that is always in my pack. It is something that has to be seen and used to be believed. Every person and student that I have shown it to cannot believe the design and know this is one amazing piece of gear.
Although I used it in Dubai and my latest workshop in India, I really wanted to try it with a new idea for a night sky panorama that my friend Chuck Ruscher had been playing with. It was a star trails panorama, something I had not tried before.
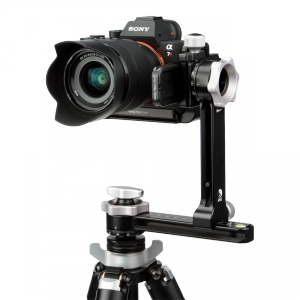
PG-01 with Sony Alpha a7R
He and I had been talking about different ways to capture the night sky, and one very cold night a while ago, we both went out here in Sedona to capture a multi-row panorama of star trails.
I have been teaching night sky photography for as long as I can remember, and most people would probably think star trails couldn’t be stitched together, especially in a multi-row shot. It’s not that easy at all, but where there is a will there is a way and the shot above shows the result of that night.
This image consisted of 180 shots of the night sky for the top row and six images for the bottom row. Using the PG-01 was extremely easy even in the total darkness because the degree markings for horizontal and vertical were easy to see with just a small amount of light. Although my friend Chuck had never used a panorama clamp or a vertical pano head, after seeing my set up he said he would definitely be interested as he loved the design and how fast I set it up.
Doing multi rows that night was a breeze, and the PG-01 feels just as fluid and graceful as its larger brother. Although we were freezing in the 32° weather and Chuck was using a sleeping bag between shots, the gear was incredibly easy to use. I can’t thank Joe Junior enough for introducing me to this set up!
Images like this can’t be put together in Photoshop and need higher end panorama programs like AutoPano Giga or PT Gui, which takes some practice, but it pays off in the end since you can capture images that are pretty special. This set up has really changed my workflow because now I can do multi row and vertical panoramas easily anywhere in the world. The set up is so small and lightweight it can fit in almost any backpack.
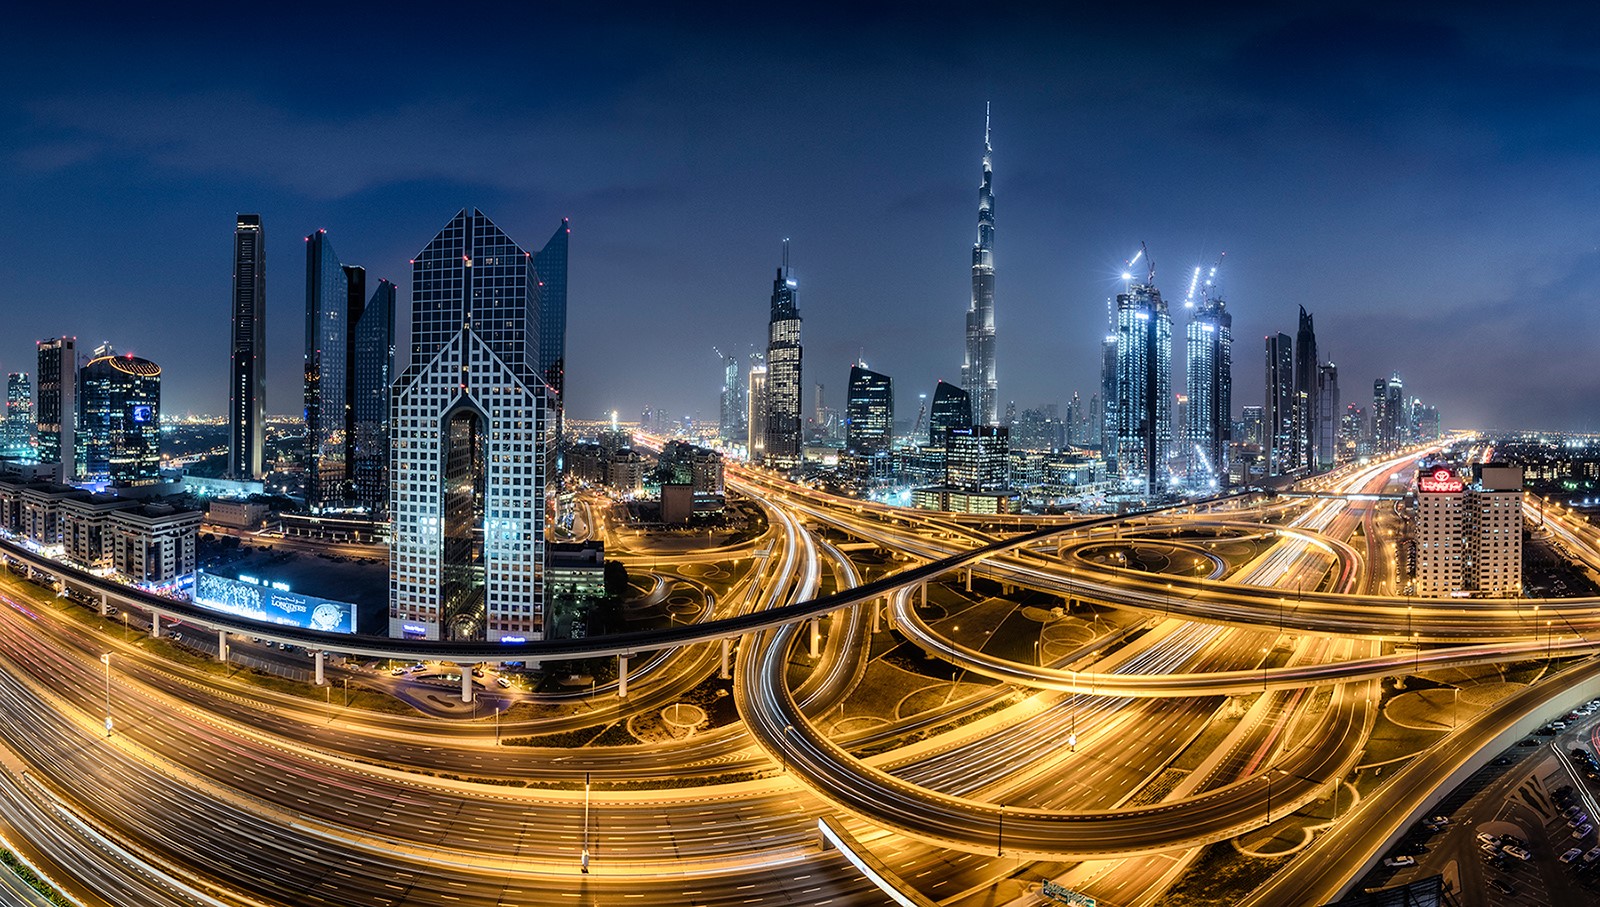
In the image above from Dubai, I was in my friend’s condominium in front of my favorite view in Dubai, and I used my regular PC-LR pano clamp. I did not want to try a multi row panorama, especially with all of the moving cars. When cars are in the equation, especially moving along at high-speed, I love using the PC-LR since I can shoot each frame quickly because of the pano clamp’s smooth movement.
After a while it becomes second nature to shoot a panorama fast without even looking at the degree markers. You get a sense and feel for the right amount of overlap, which for me is usually from 30 to 50%. I ended up with a shot that I had always wanted to take but had never seen before, a panorama of the amazing Dubai skyline from my favorite spot in Dubai. I am so used to using Really Right Stuff to capture these one-of-a-kind images that I can’t imagine shooting without it!
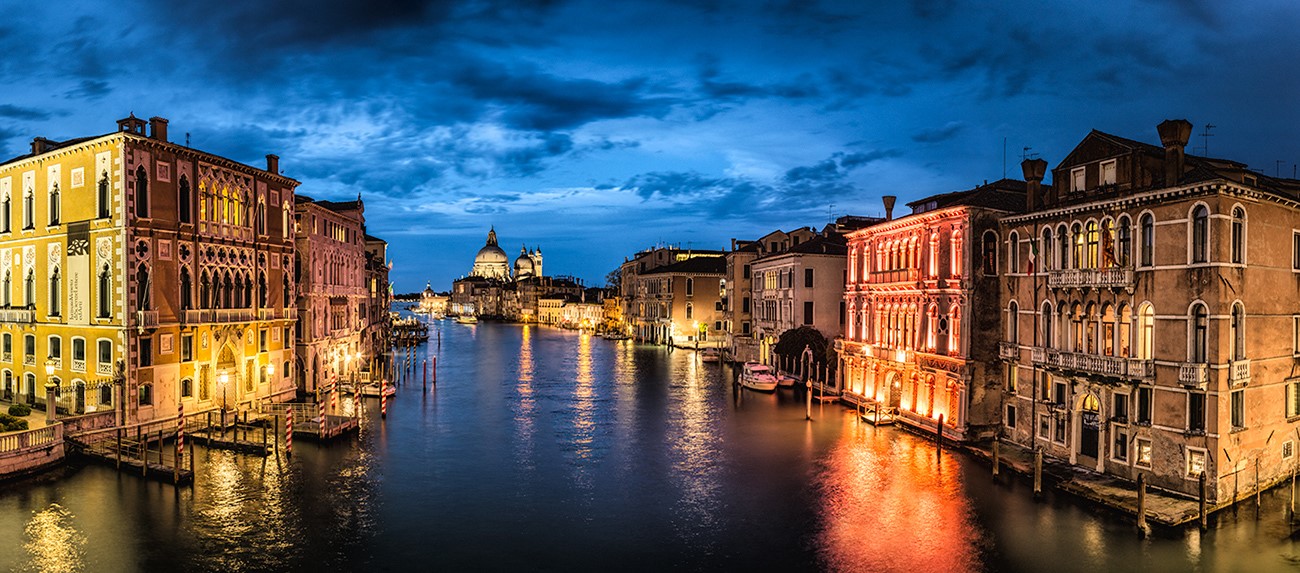
Recently in Venice, Italy, while scouting out for a new workshop, I felt the exact same trust in my pano clamp when taking the image above. Although I could have used the PG-01 for a multi row panorama, I knew with all of the gondolas and boats that jump into the frame, a straight panorama was just what the doctor ordered. For me, I can’t imagine shooting images like this without my pano clamp. It just feels right, and although I still have many friends and students that think they can create equally good images without a pano head, I’ve learned that nothing beats good gear.
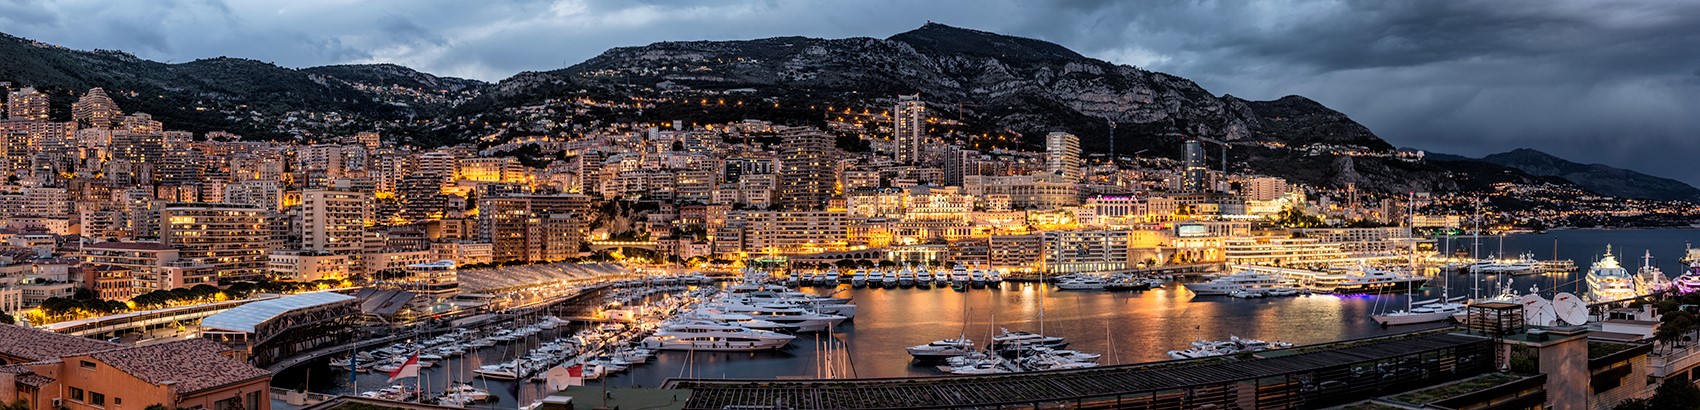
The last photo above of Monte Carlo, was another difficult panorama to capture. It consisted of a 15-shot pano, that I also shot as an HDR, and ended with 45 images overall. That meant that I moved the camera from left to right 15 different times because the breathtaking view was begging me to shoot the entire 180 degree view. If you have never been to Monte Carlo, it has to be one of the most spectacular cities on earth. After scouting out this view with my friends, we knew we had a great vantage point to capture a pretty striking panorama.
Trying to capture an image like this without my panorama gear would be a daunting task, and I have it in my backpack in every country and city that I travel to. The shot above is cropped because it is too wide with all 15 frames. But that gave me the ability to crop it however I wanted for different agencies that might want to use the image. Doing an HDR panorama made sure that I would not have blown out highlights or muddy shadows. Although it required much more processing, the extra work definitely paid off!
I have to thank Joe Junior and his father, Joe Senior, for making gear nobody else does. It’s often imitated, but just like Porsche, there really is no substitute.
As a photographer, especially a travel photographer, I put their gear through the ringer in so many different cities around the world and having this incredibly designed and machined equipment has been a lifesaver. They have helped so many of us create some of the best images of our lives, and life would really not be the same without them.